
 Share This Page
| Home | | Climbing | | | Share This Page |

Copyright © 2020, Paul Lutus — Message Page
Initial Publication: 07.28.2020
Most recent update:
(double-click any word to see its definition)
NOTE: This article is now available as a video with the same name. Check it out!
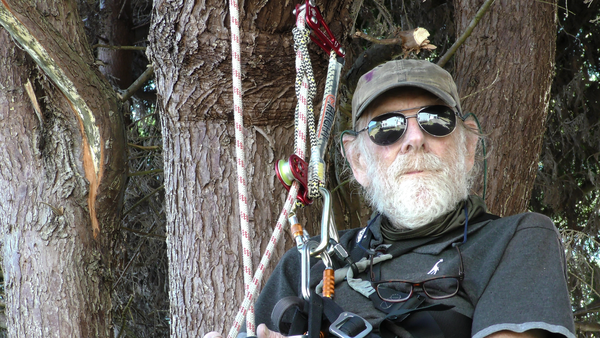
Figure 1: Author aloft
First, please read this disclaimer. I'm happy to describe rope work, but the ultimate responsibility lies with the reader.
Professional Instruction
Second, this is an exposition, not a tutorial. For reasons of safety, readers who decide to pursue this topic must consult with a professional climbing instructor. This is not an activity that tolerates errors or misunderstandings, and no article can substitute for one-on-one instruction with a professional.
Modern Equipment and Methods
Ascent by rope is much improved over past decades — better ropes, better ascenders and descenders, equipment more reliable and easier to use. The activity has matured to the extent that rope ascent of a building, a tree or a rock wall is much safer than a rickety aluminum ladder, and if the climb is more than about ten meters (33 feet) in height, it's also the only realistic choice.
Climbing Rope
A modern climbing rope with a (preferred) diameter of 11 millimeters (mm) can support the weight of four Volkswagens. This doesn't mean it won't break in extreme situations like abruptly arresting a fall from height, or remain safe after more than a few years of outdoor use and associated ultraviolet exposure. It does mean that a properly rigged rope, connected to a properly rigged climber, is the safest way to ascend to a height — safer than a ladder or a free-climb.
Acrophobia
On the topic of acrophobia (fear of heights), I can't overemphasize the psychological effect of learning how to use modern climbing equipment and acquiring an evidence-based grasp of the reliability and safety of modern rope work. For me personally, learning rope climbing erased a lifelong irrational fear of heights and replaced it with a new outdoor activity and a useful skill.
Look Down!
In movies you sometimes hear people say, "Whatever you do, don't look down". But that's wrong — definitely look down, at every opportunity. And why? Because if while climbing you periodically look down and say, "I'm safe here — my skills and equipment will protect me," then by the time you get to a height that would make rescue difficult or impossible, you won't suddenly freeze up.Single Rope Technique
This article discusses and shows examples of Single Rope Technique, the most widely applicable rope ascent/descent method. A number of this article's equipment choices and methods include this assumption.
This article starts with basic principles — the physics of climbing — then shows what kinds of equipment and methods are available. Let's get started!
Before introducing ropes, hardware and techniques I want to cover climbing from a physics standpoint — how climbing is about energy management.Up and Down
- When you ascend a rope, you convert your body's chemical energy into gravitational potential energy (GPE). If your body can't provide the required energy, you can't climb any further — a simple idea.
- When you descend a rope, the GPE accumulated on the ascent is converted into kinetic energy (KE), mostly as heat. If the heat energy is too high for the descender rig, it may fail and the descent might become uncontrolled. I think that's called "falling".
(If you hate mathematics, skip this next part.)
Energy Equation
Here's the GPE equation:
\begin{equation} U = mgh \end{equation}Where:
- $U$ : Gravitational Potential Energy (GPE), units Joules.
- $m$ : Climber's mass, kilograms.
- $g$ : Earth gravitational constant ("little-g"), equal to 9.8 $m/s^2$.
- $h$ : Climbing height, meters.
Here's an example problem to show how this works. A climber weighs 80 kilograms (176 pounds) and climbs 30 meters (a bit less than 100 feet). Therefore while climbing (s)he adds (80 * 30 * 9.8) 23,520 Joules of GPE to the system.
Human Machine
How many calories did (s)he burn while climbing? To convert from Joules to dietary calories (technically kilocalories), divide Joules by 4184, so (if a human were 100% efficient) (s)he burned (23,520 / 4184) 5.6 calories. But because the human "machine" is only about 22% efficient, the climber actually burned (5.6 / 0.22) 25.45 dietary calories. So climbing can be justified as a weight loss strategy.
(Math haters — start reading again!)
What goes up must come down
Remember that energy cannot be created or destroyed, only changed in form. This means the GPE calculated above must be safely converted to heat during the descent. If our 80-kilogram climber descends 30 meters in ten seconds, the instantaneous power level is (23,520 / 10) 2,352 watts, and unless the descender device is metal and well-designed (and the climber is wearing gloves), that is too much power and too much heat over too short a time interval. At that descent rate a fully rope-based descender rig with no way to dissipate energy in metal parts would likely melt and endanger the climber.
Heat Dissipation
The above explains why modern descenders have metal parts and other advanced ways to transfer the descent friction away from the rope to temperature-tolerant metal and safely dissipate the heat. Remember this example and this warning — limit your descent rate and monitor your descender device for signs of overheating.
The take-away: When in doubt, descend slowly — a slow descent reduces the instantaneous power level so the heat energy can be safely radiated into the air.
Ascending
The basic principle of ascent is to cyclically transfer the climber's weight between two (in some cases three) rope friction devices. Some devices only allow ascent, others work for both ascent and descent. One principle in ascent is not to waste energy, so the friction devices firmly grip the rope to prevent downward motion, but release their grip to allow upward motion.
The most efficient ascender rigs rely on the climber's leg muscles for propulsion — the strongest part of the body. In a typical one-way ratchet scheme:
- In Phase 1 the lower ratchet transfers leg power to the rope and lifts the climber, while the upper ratchet, attached to the climber's harness, ascends along the rope.
- In Phase 2 the climber lifts his legs in preparation for the next power stroke. In this phase the upper ratchet is stationary and the lower ratchet moves up the rope.
One important variation of this pattern is the "walking ascent", described more fully below, in which three ascender devices are in play — one on each leg and one attached to the harness. The walking ascent relies on a continuous motion of arms and legs and among existing ascent methods it represents a natural and continuous motion.
Descending
The best climbing rigs allow both ascent and descent with the same devices. When available, this allows the climber to easily change direction while working at height.
In less efficient systems, to change direction the climber must disengage one set of devices and engage another, not desirable in a flexible working environment.
In the following examples of ascender and descender systems, I list only devices I've personally tested.
This describes an old-fashioned, economical rope-based ascender/descender system, no metal parts. Because there are no metal components for heat dissipation, climbers must be very careful to avoid overheating the climbing rope and/or friction hitches. Don't try this method without professional instruction.
The Prusik hitch was invented by Karl Prusik (pronounced prussik but not spelled that way) in the 1930s and has been in use ever since. It's a simple and reliable hitch to learn and use, but for safe ascending and descending it must be fully understood.
Here's how to attach a Prusik hitch (always set three loops):
Figure 2: Attaching a Prusik hitch to a climbing rope.
When attaching this hitch, pay attention to the "dress" of the hitch — the Prusik's effectiveness depends on its being laid out correctly. The above video shows the correct layout.
To ascend with this system, the climber repeatedly engages and releases the two Prusik hitches. Here's a short video showing the method:
Figure 3: Example of the two-Prusik ascent method.
Climbers must be very careful using this method. Never allow any significant amount of friction while the Prusik hitches are in motion along the rope. The basic idea is that the hitches are either released and moving without friction, or securely clamped to the rope and stationary.
To descend using this method, simply reverse the time sequence shown in Figure 3 — repeatedly move the lower hitch down, then move the upper hitch down, while preventing any significant friction on a moving hitch. Never try to slide a Prusik hitch along a rope while it's under friction.
Prusik Hitch Loop Details
The two Prusik hitch loops used in this method are 130 cm (51 inch) lengths of 8mm climbing grade rope, each shaped into a loop with two Double Fisherman's Bend knots. Like this:
Figure 4: Creating a loop with two double Fisherman's bend knots.
Always create the two Prusik hitch loops in this or a similar way, but because these loops are safety-critical, don't use ordinary knots — and never use a square knot.
In this ascent method, a chest croll by Petzl or another vendor, attached to the climber's harness, works in concert with an "ascender" rope clamp linked to loops around the climber's feet.
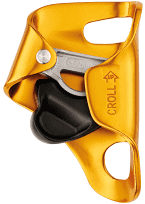
Figure 5: Petzl chest croll
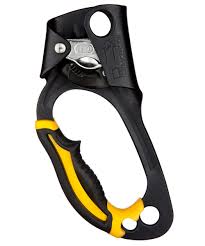
Figure 6: Petzl ascender rope clamp (normally attached to foot loops)
Here's how this system works in the field:
Figure 7: Example of the "chest croll" ascent and descent method.
In Figure 7, notice an important detail — attached to the chest croll is an elastic cord looped around the climber's neck. This is essential to keep the croll in the correct position during the ascent. But use an elastic cord, not a rigid one — a rigid cord would be dangerous.
To descend with this system, unfortunately one must completely disengage the two ascent devices shown in Figures 5 and 6 above, and attach a descender device like a Grigri (shown in Figure 7), I'D S or another specialized descender device (descenders are covered below).
The walking ascent is a more efficient acscent/descent method than those shown above. In the walking ascent each leg has a separate ratchet device and the climber's harness is attached to a third device. Apart from being more efficient, this method looks a bit like walking, but ... straight up. Here's an example:
Figure 8: Example of the "walking ascent" and descent method.
In the walking ascent, the climber's harness is attached to one friction device and each leg is attached to others, for three friction devices altogether. In the above video the climber is provided with a foot ascender on one leg and my custom knee ascender on the other.
Vertical Path Requirement
This ascent method has a special requirement — the harness-connected ascender device must allow the rope to pass through vertically, which means devices like the Petzl Grigri or I'D S (described below) cannot be used.
The Parts
Here's a walking ascent component breakdown:
Attached to the climber's harness — a Petzl ZigZag/Chicane combo (used in the video above), ISC Rope Wrench or another bidirectional, vertical-path ascent/descent device:
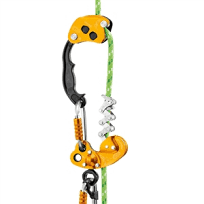
Figure 9: Petzl ZigZag/Chicane combination device
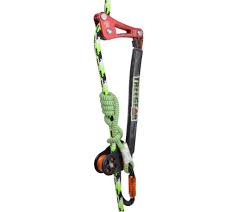
Figure 10: ISC Rope Wrench combination device
(There are many similar devices available,
these two are the best-known at the time of writing.)Attached to one leg — a foot ascender:

Figure 11: Foot ascender.
Attached to the other leg — my custom knee ascender device:
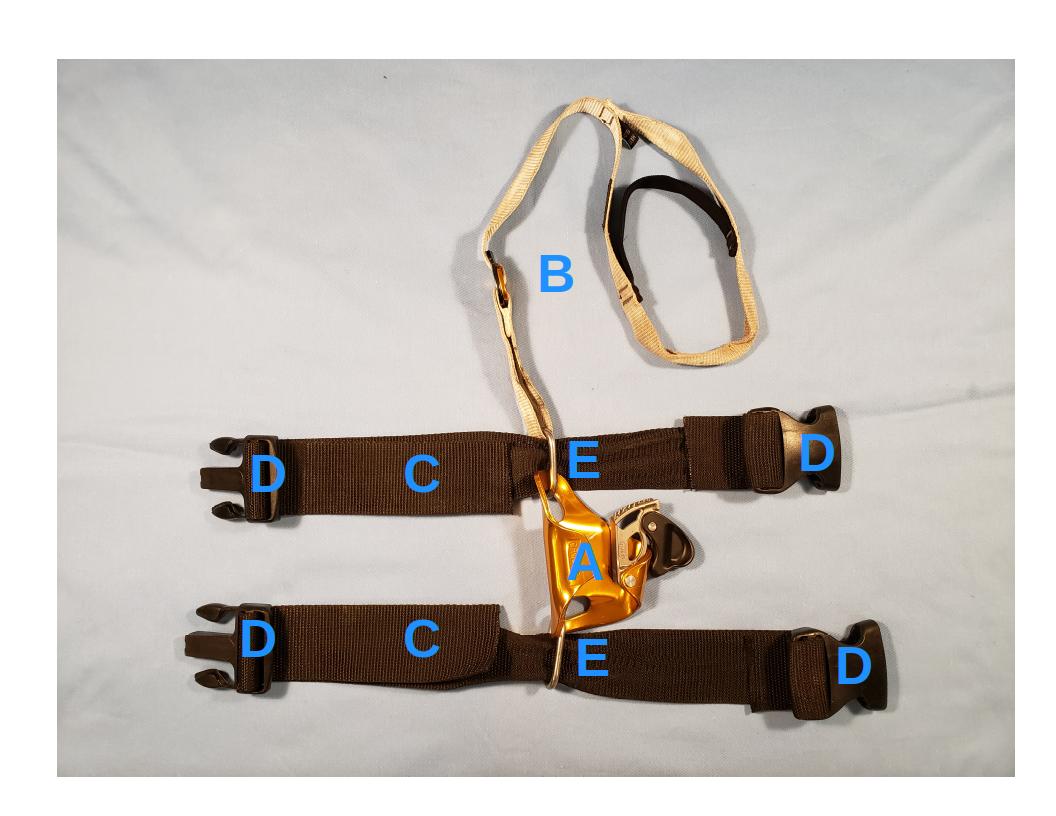
Figure 12: My knee ascender.
Figure 12 shows the ascender upside-down, as a climber would see it while putting it on.
My knee ascender parts:
- A: (1) Petzl croll.
- B: (1) Foot loop, can be made from a simple line.
- C: (2) lengths of 5 cm (2 inch) width polypropylene strap material.
- D: (2) 5 cm (2 inch) width plastic buckles.
- E: (2) Small (M5) screwgate carabiners (connects the webbing to the croll).
The wide 5 cm webbing was chosen for comfort and to avoid cutting off the climber's leg circulation.
As shown in the video above, position one of the knee ascender's straps above the knee, one below.
About my knee ascender design:
- This specific design is original with me, but not the idea for a rigidly attached knee ascender.
- Before designing this device I tried the available elastic-return knee-ascender methods Petzl and others offer, but they work very poorly.
- My device is efficient and reliable and the parts don't cost very much.
- Why don't any of the climbing outfitters build and sell a device like this?
While reading what follows, remember this article's context — Single Rope Techniques.
Again, I list only devices that I've personally tested.
Single Role Devices
These devices are for descent only, they must be accompanied by separate ascenders in the field.
Traditional Figure-8 Descender
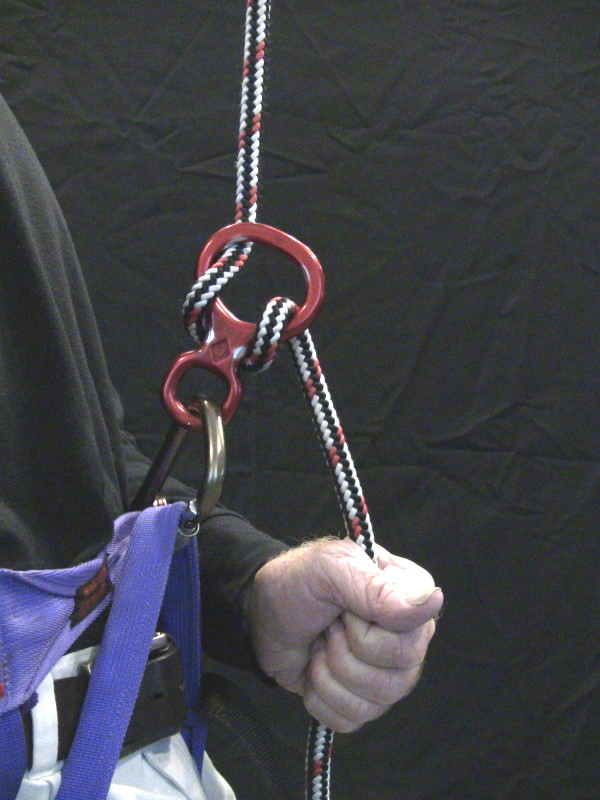
Figure 13: Figure-8 descender
I include this device only to show how much progress has been made in climbing gear compared to past decades. In Figure 13 the climber controls the descent by hand, but if for any reason (s)he loses grip on the rope, an uncontrolled fall may result. This has obvious safety drawbacks, and in order to work while using this device, the climber would have to set up a separate support rope.
Petzl Grigri

Figure 14: Petzl Grigri
This is a very popular descender with a long history. It is physically small and lightweight, but it functions as a reliable descender on commonly encountered rope sizes (between 8.9 and 11mm in recent models).
Because of the Grigri's small size and weight, experienced climbers sometimes carry it as a spare descender for emergencies.
As with many recent Petzl designs this device has the safety feature that if the descent handle is released, motion immediately stops.
Petzl I'D S
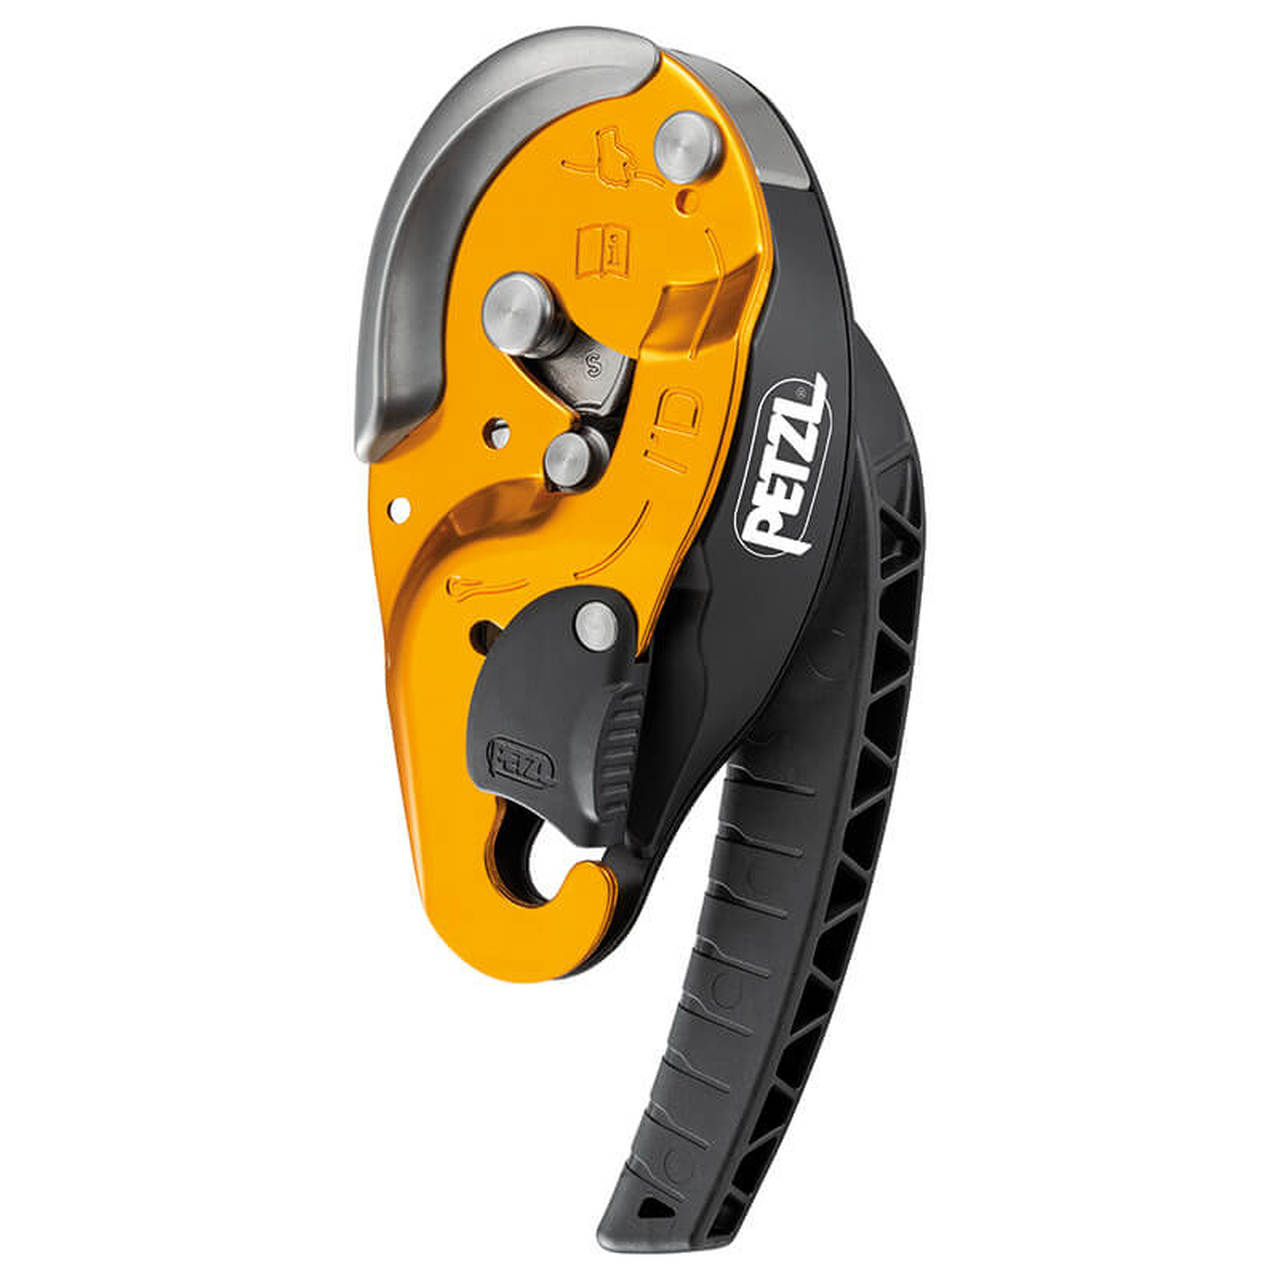
Figure 15: Petzl I'D S
This device is the Grigri's "big brother". It's physically larger, is able to handle greater loads, and it has a more advanced safety release method in which either releasing the descent handle, or pulling it too hard, will stop the descent.
Dual Role Devices
The best modern descent devices serve dual roles — they function during ascent as well. My current favorites in this class are the Petzl ZigZag/Chicane combination and the ISC Rope Wrench combination, both introduced earlier in the walking ascent section. I also list the ingeniously designed but controversial Rock Exotica Akimbo, which (in online conversations) people seem to either love or hate.
Petzl ZigZag/Chicane combination
- Pros:
- Easy to learn and use.
- Consistent in operation.
- Robust against rapid descents and high heat loads.
- Cons:
- Expensive.
- Heavy.
- Cannot be installed mid-line.
ISC Rope Wrench combination
- Pros:
- Inexpensive compared to the Petzl device.
- Small and lightweight.
- Mid-line installable.
- Cons:
- Requires skill and practice to set up.
- Control line wears over time and must be replaced periodically.
Rock Exotica Akimbo
- Pros:
- Ingenious design.
- Small and lightweight.
- Mid-line installable.
- Cons:
- Expensive.
- Requires rope sizes between 11.5 and 13mm
- Needs field tuning for a given rope size.
- Somewhat sensitive to rope types and conditions.
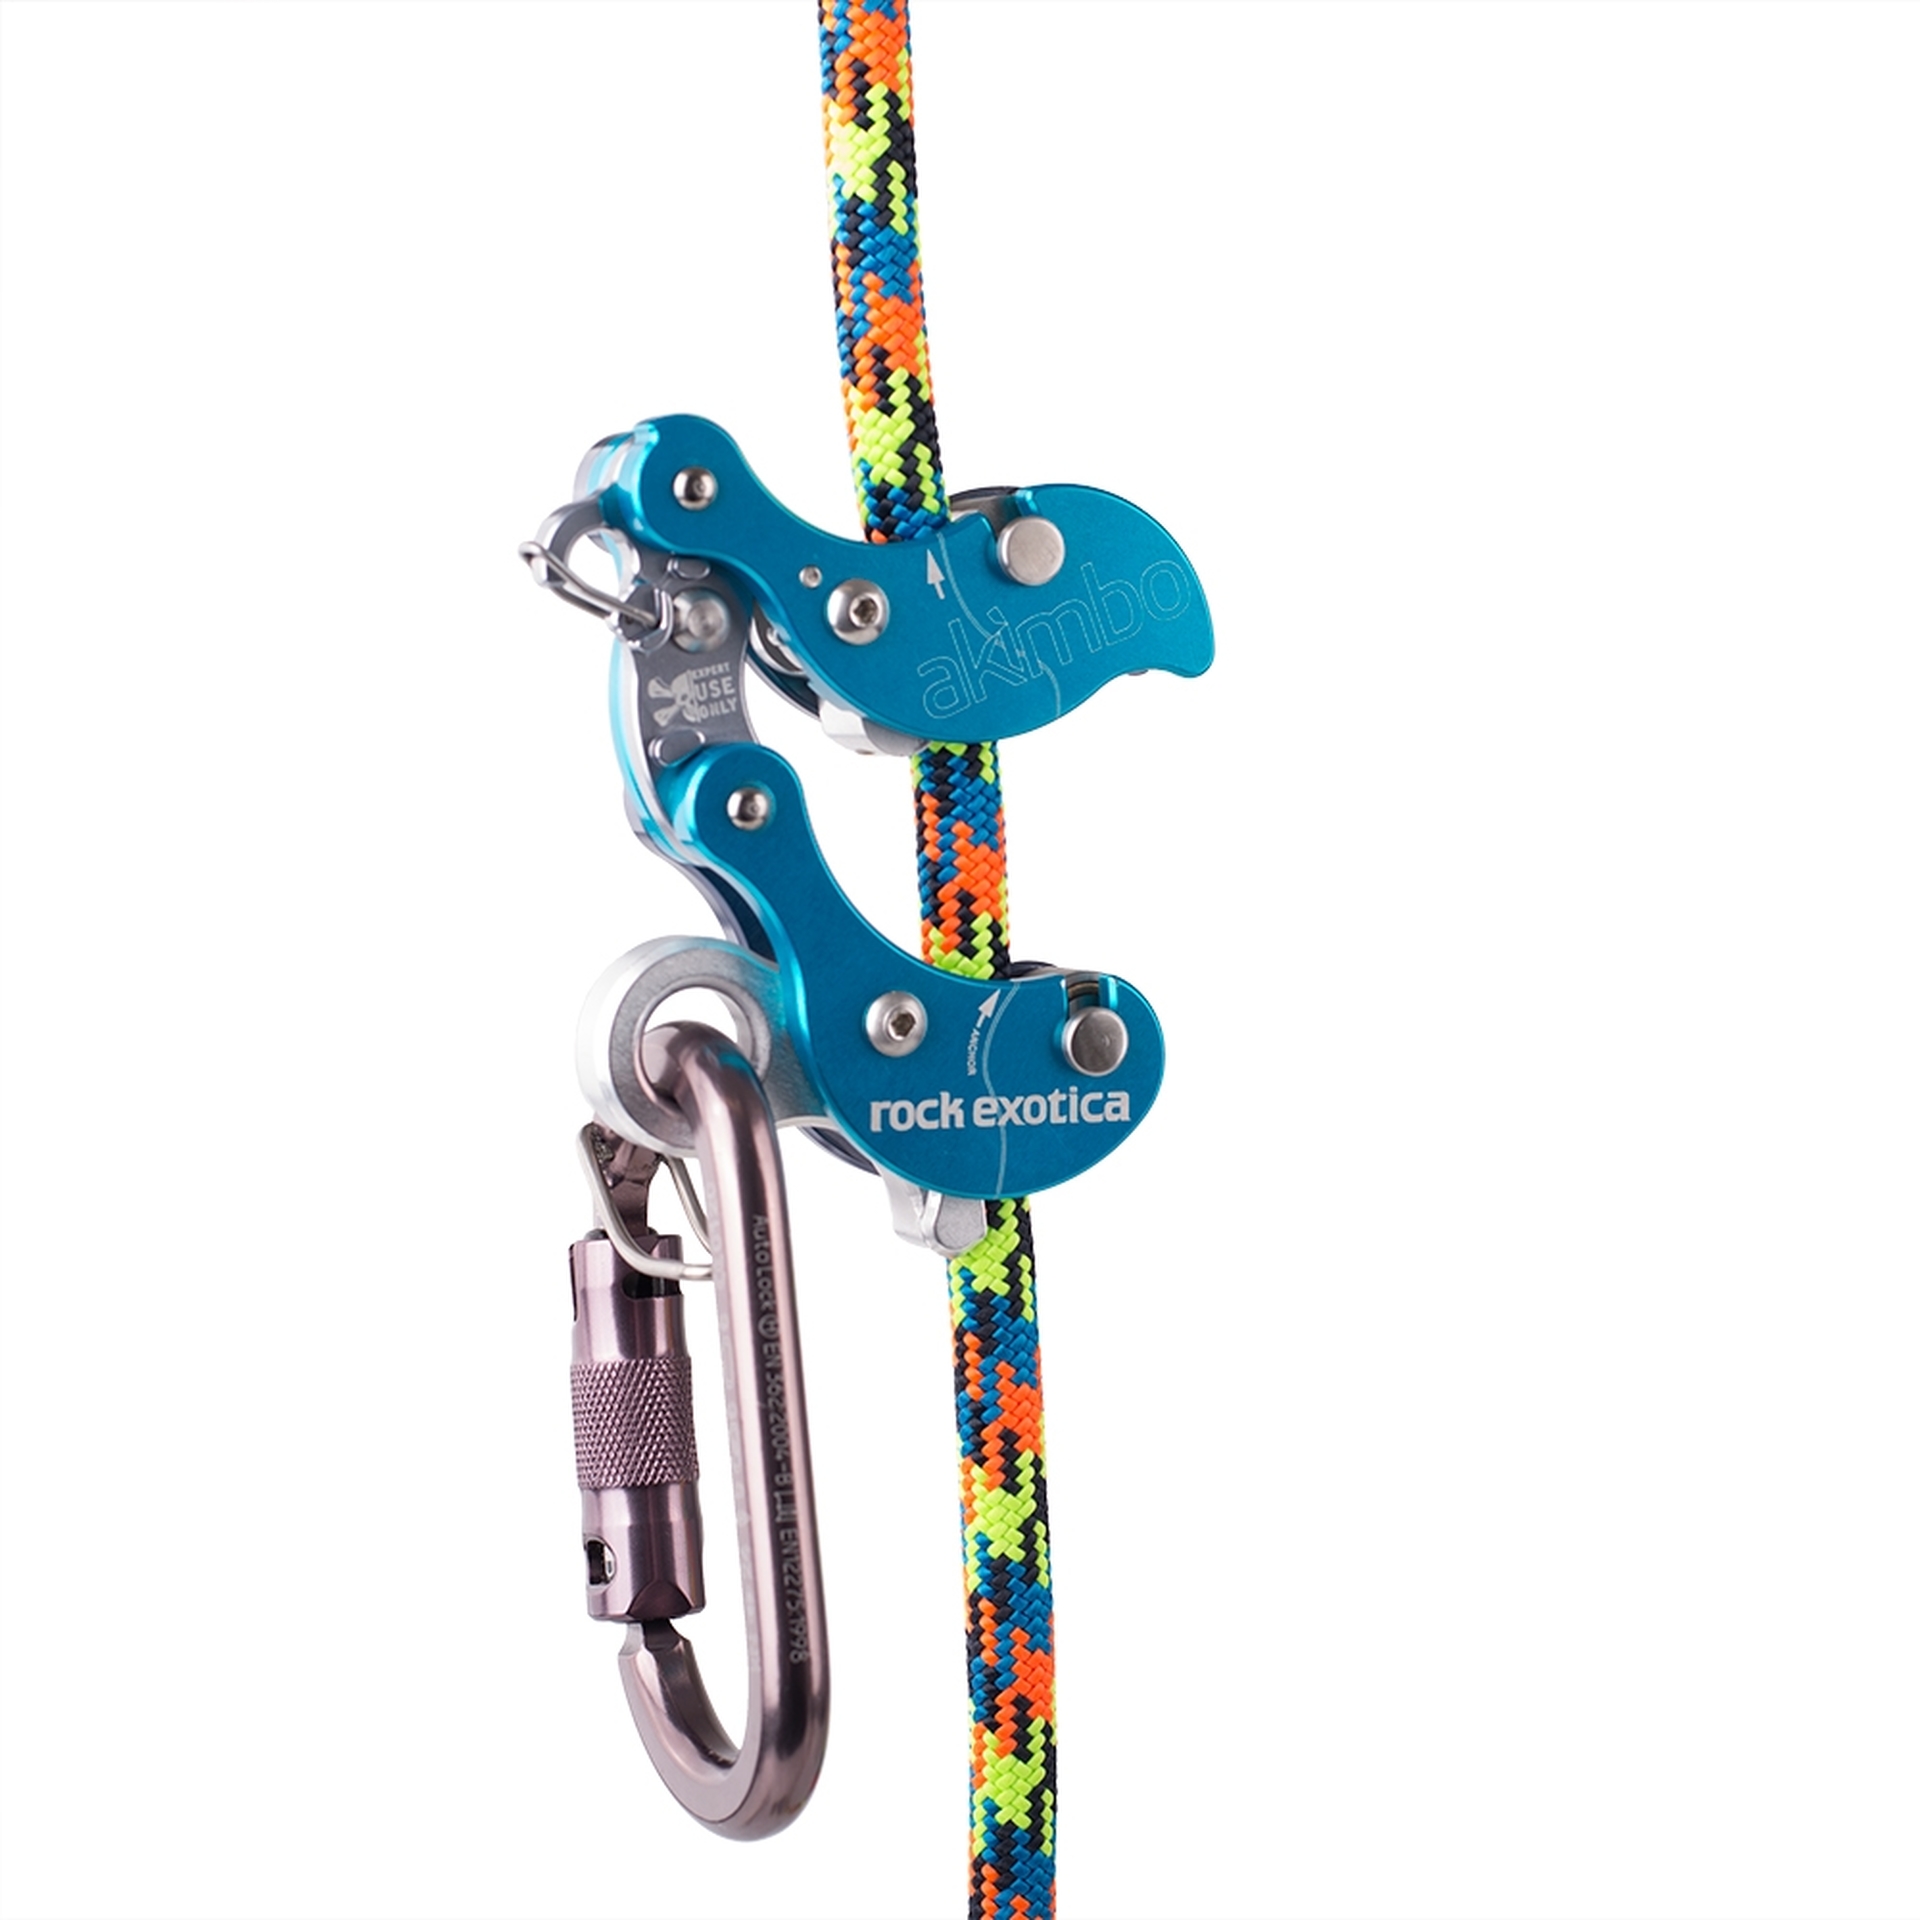
These devices all allow a vertical rope path, so they behave well regardless of the rope's length, and they function as part of configurations like the walking ascent.
There are many other ascender/descender devices available that serve this purpose, no slight was intended by their omission.
Again, this article's context is Single Rope Technique (SRT) and practical rope ascents for work and exploration. In this context the correct rope type should be "static". Here are the definitions:
A dynamic rope has more stretch and is meant to safely arrest a climber's fall in a sport climb where there may be a significant amount of slack in the rope.
A static rope has minimal stretch ("maximum elongation of 6% at 10% of minimum breaking strength"), meaning it doesn't waste much of your climbing energy by stretching and heating up.
In a dynamic rope climb, the climber is free to allow some slack in the rope, because in the event of a fall the rope will stretch and absorb most of the fall's energy and protect the climber from shocks.
In a static rope climb, the climber is expected to take up slack as the climb proceeds, because any significant free-fall distance on a static line could injure the climber.
Another way to say this is that a dynamic rope climber climbs the terrain, while the static rope climber climbs the rope.
Rope Selection
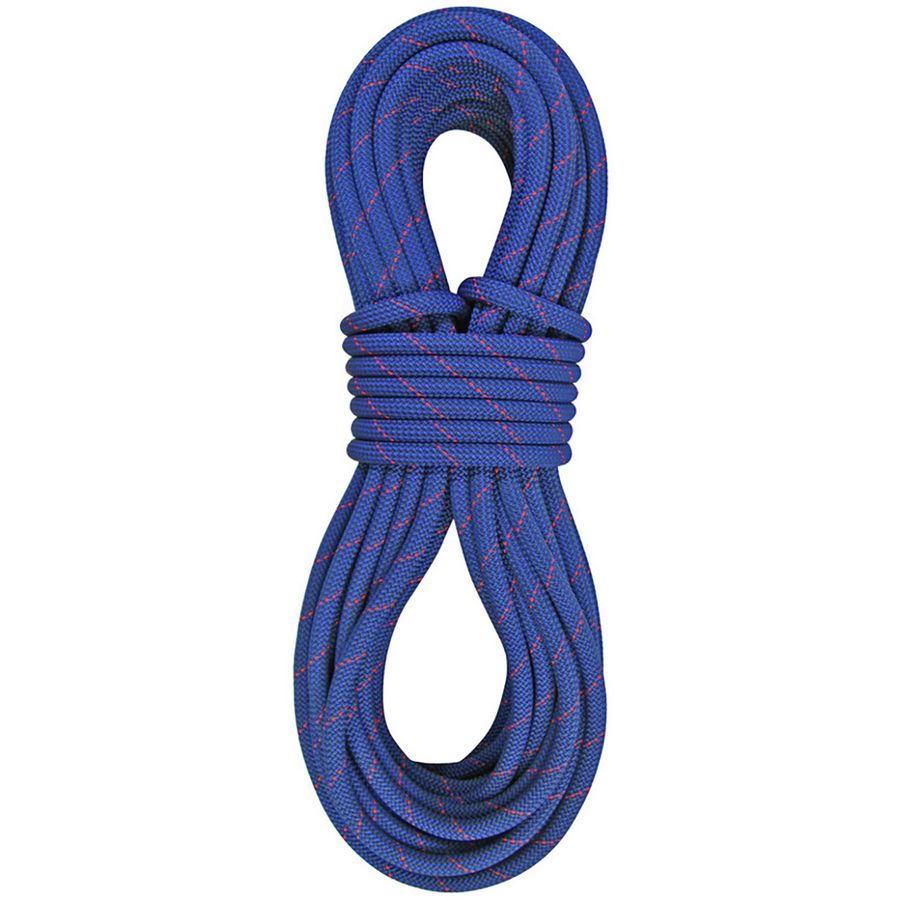
For most of the examples and equipment in this article, an 11 millimeter static Kernmantle rope is the right choice. The Kernmantle rope design has an outer sheath to protect the inner core that provides most of the rope's strength.
The 11 mm rope size works well with all the methods and devices listed above except the Rock Exotica Akimbo, which requires a minimum of 11.5 mm.
Rope Strength
A word about rope strength:
- A typical 11 mm Kernmantle rope has a breaking strength of 3467 kilos or 7,627 Pounds.
- A Volkswagen Beetle has a curb weight of (at most) 840 kilos or 1,850 pounds.
- Based on this, the rope could support the weight of four Volkswagens and have enough remaining capacity to support four heavy climbers each weighing over 100 kilos (220 pounds).
On the other hand:
The above Volkswagen example is very hypothetical, for a number of reasons including that all rope knots and bends reduce the rope's strength, so the knots that tied the cars to the rope would likely fail first. Here is a table of knot strengths as percentages of the rope's strength:
Knot Percentage Image Figure 8 follow-through 75-80% 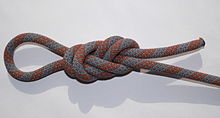
Bowline Knot 70-75% 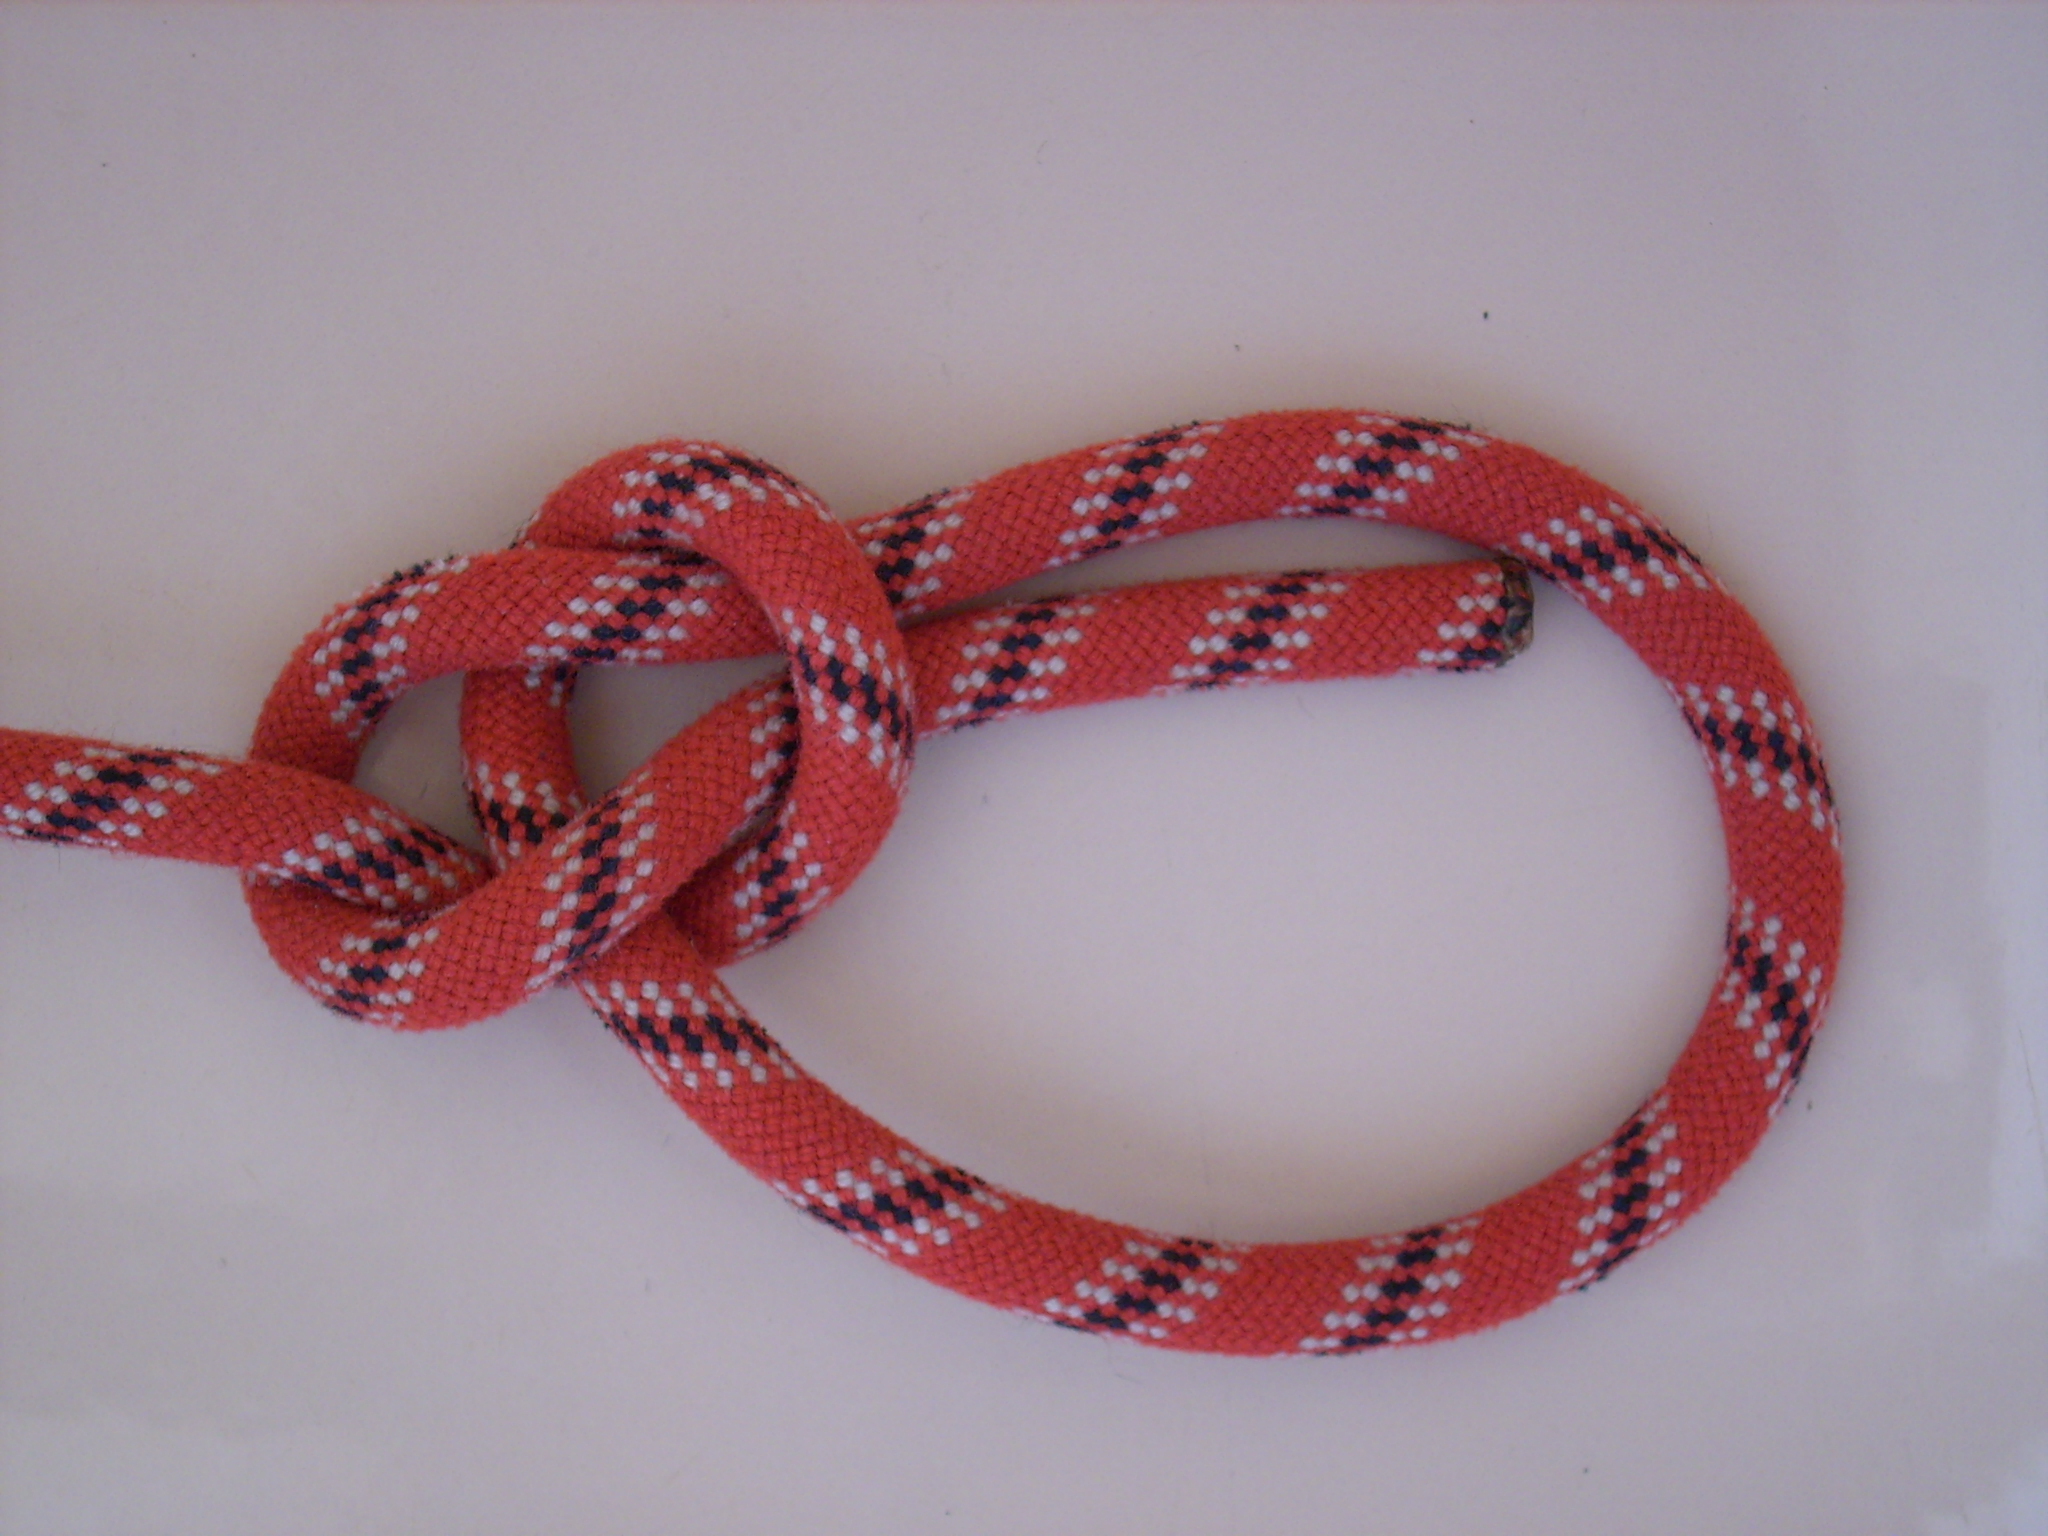
Double Fisherman's Bend 65-70% 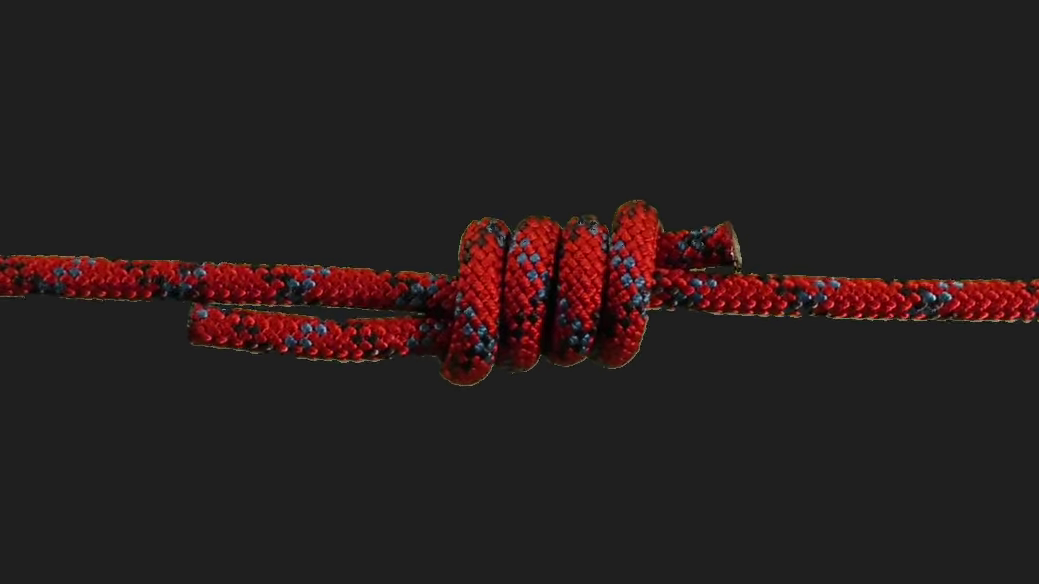
Clove Hitch 60-65% 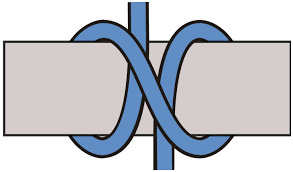
Over time, shocks, embedded grit and ultraviolet light exposure weaken a rope, such that a rope that's used daily should be replaced every year, while an occasional-use weekend-type rope might last several years.
Rope Diameter versus Strength
A rope's cross-sectional area — and strength — is proportional to the square of its diameter, so on this basis an 8mm rope has just 53% the strength of an 11mm rope, and a 6mm rope has only 30%. Remember this relationship when evaluating rope sizes and strengths.
How one rigs a tree climbing rope depends on the desired height:
The simplest method involves tossing a coil of rope over a limb, but that has obvious limitations.
The next method is a tossed or slingshot-launched lead-filled beanbag weight attached to a light line, after which the light line raises the climbing rope.
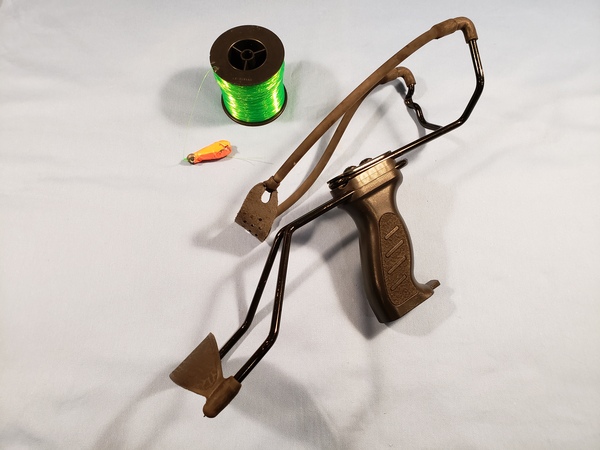
A three-phase method exists to achieve maximum height: a slingshot launches a 250 gram (roughly 8 ounce) fishing weight (covered with a brightly colored tape for visibility) attached to a thin monofilament fishing line. The monofilament line then raises the light line from the prior step, then that line raises the climbing rope.
With practice (and a strong slingshot) this approach allows raising a climbing line to 30 meters (100 feet).
Rig Sequence Video
Here is a video of the maximum-height rigging sequence, using all the above-listed elements, but using a limb height chosen for easy photography:
Figure 16: Maximum Height Rope Rigging Sequence.
Unloading the Target Limb
In the above video, astute readers will notice that I tied an Alpine Butterfly to the climbing rope and raised it up to the target limb, which makes the limb itself the anchor for the load. This may seem an unimportant change — after all, I could have anchored the rope to an adjacent ground-level attachment point with much less effort.But there's a reason for this extra step — if I had tied the rope to a ground-level anchor, the target limb would experience twice the climber's weight because of the system's mechanical advantage:
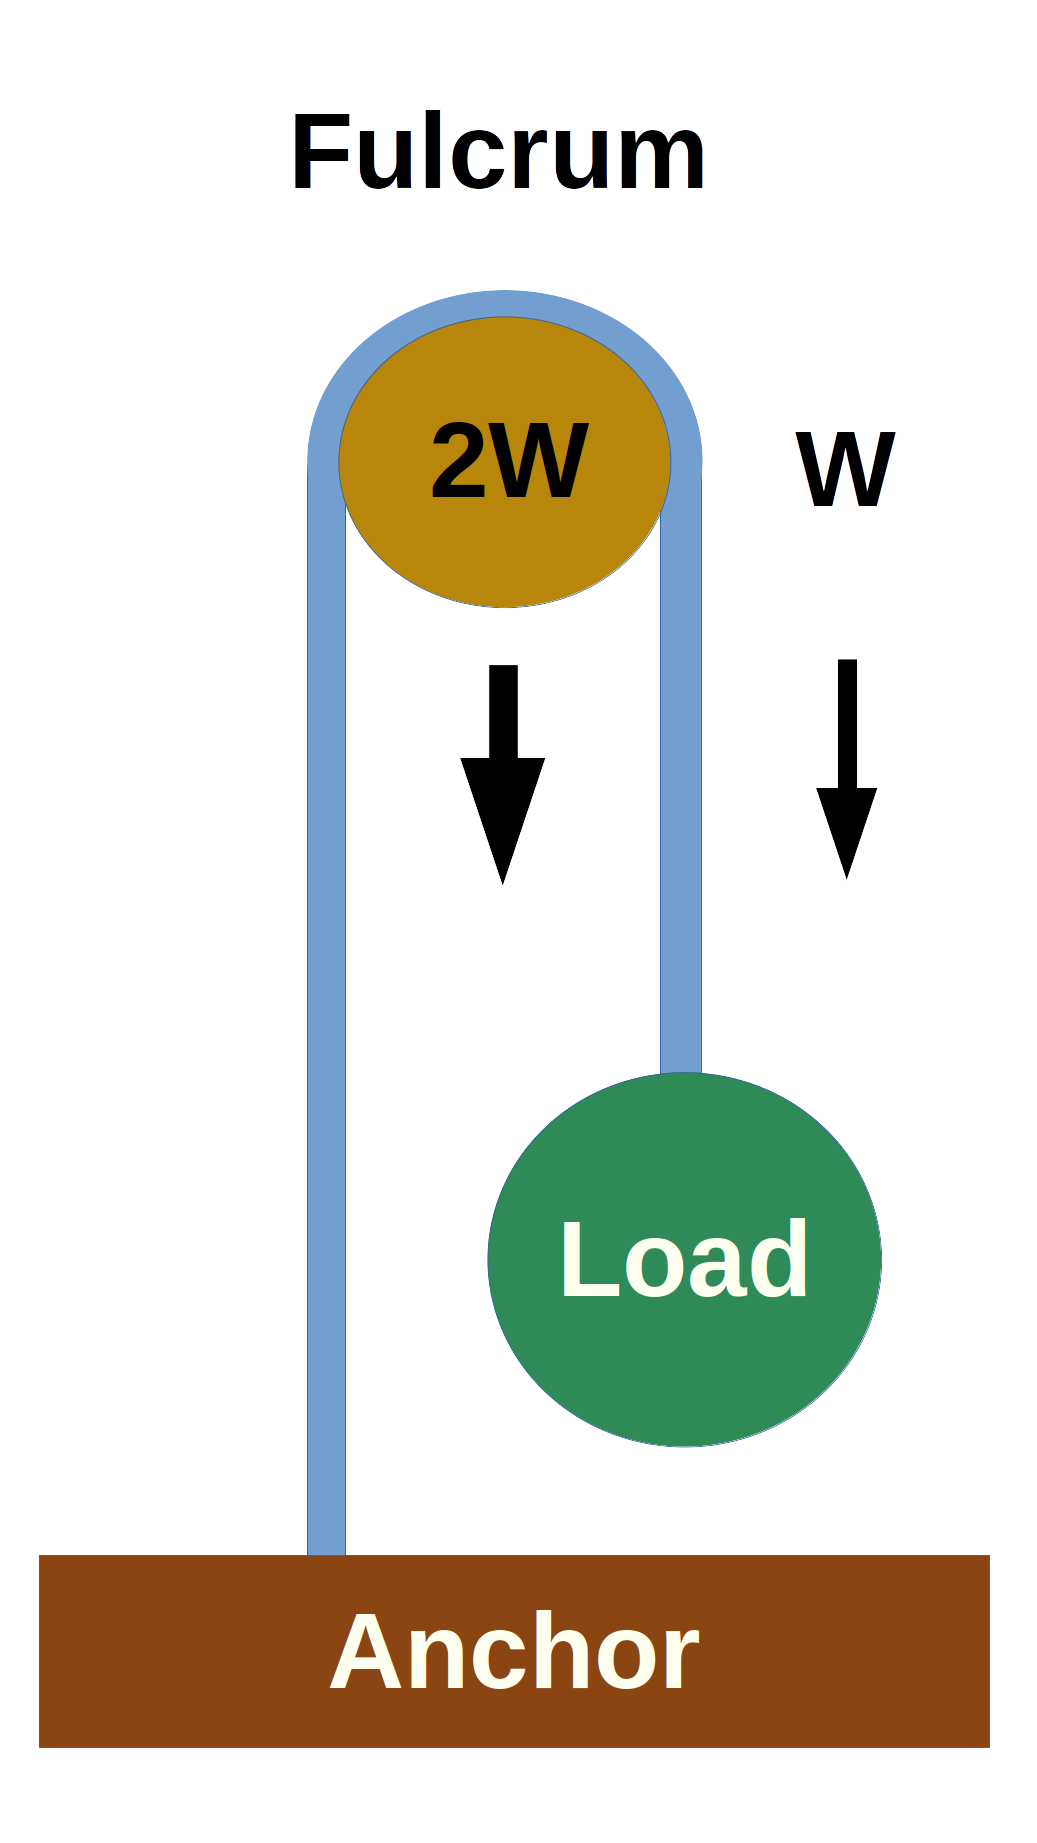
Figure 17: Mechanical "dis-" advantage to the target tree limb caused by a separately anchored rope.
By contrast, if an Alpine Butterfly or other mid-line loop is raised to the target limb, this makes the limb the primary load-bearing element and the limb experiences only the climber's weight, not twice that weight.
Alpine Butterfly
Here's how to tie an Alpine Butterfly:
Figure 18: Tying an Alpine Butterfly.
Among knots, I can't praise the Alpine Butterfly highly enough:
- It can be applied mid-line.
- It won't jam under load.
- The loop won't pull out or change size under load.
- It's easy to undo when you're finished with it.
- It's easy to learn.
- It can be validated at a glance.
- It has a cool name
.
I wrote this article partly as research and preliminary video footage for a same-topic video I'm working on (update: now completed). It hasn't escaped my attention that in modern times Web pages, and other forms of printed matter, reach far fewer people than videos do.
But in truth, because of my age and background I'm a better article writer than a video creator. It remains to be seen whether I can adjust to a world where people absorb ideas by way of flashy videos instead of words.
All that aside I hope this article serves its primary purpose — education. Thanks for reading!
Excellent SRT!
In no event shall the author be liable for any loss or damage including without limitation, indirect or consequential loss or damage, or any loss or damage whatsoever arising from injury or loss of life arising out of, or in connection with, the use of the information presented in this article.
| Home | | Climbing | | | Share This Page |