Share This Page
| Home | | Computer Graphics | | Adventures in Ray Tracing | | | | Share This Page |
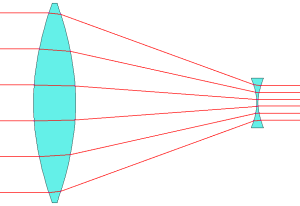
HistoryIn this and the following pages I will show how to build and test some virtual telescopes using POV-Ray. We'll start with the simplest — and possibly the first — telescope, named "Galilean." In its present stage of development, POV-Ray is able to treat lenses and mirrors with a great deal of realism. In POV-Ray's virtual world a lens will refract light, a mirror will reflect light, and an image can be formed by various combinations of lenses and mirrors. This means we can use POV-Ray to model telescopes and other kinds of optical instruments, at near-zero cost. Our first telescope, called "Galilean" because of its association with Galileo Galilei, is a very simple optical system consisting of two lenses, one convex (the large objective lens), one concave (the small eyepiece lens). The version I present here is meant not so much to represent a useful telescope, as to reveal its design and display the paths of light beams. A practical telescope of this kind would have a much longer tube, and possess an objective lens with a longer focal length.
Galilean Telescope Optics
(OpticalRayTracer)
PropertiesThe telescope we call Galilean actually existed in various forms for some time before Galileo began to build his own versions around 1610. As time passed Galileo increased the magnification of his instruments and began observing objects in the night sky. Galileo's work with his telescopes was to cause quite a lot of controversy, because by direct observation it contradicted the then-accepted view of reality that had the earth at the center of the solar system, with the sun and all the planets orbiting around it (this was the so-called "Ptolemaic" system). Galilei observed Jupiter's larger moons revolving around Jupiter itself, and proclaimed this as a model of the solar system, with the sun, not the earth, at the center of the system. This and other proclamations came to the attention of the Church, which had a vested interest in the older Earth-centered model. The Church eventually placed Galileo on trial, forcing him to recant his statements or face torture. Yes, this is how thinking people sorted out their differences before science came along and evidence became more important than belief. By the way, the reason the Church reacted so strongly to Galileo's observations and conclusions was because, in that far-off time, the Earth was the center of the universe, Rome was the center of the Earth, and the Church was the center of Rome. If someone tried to claim that the Earth was just another planet (derived from a Greek word meaning "to wander"), then Rome might be just another city, and the Church might be just another church, spelled with a lower-case "c". The big-C Church wasn't going to allow that to happen, evidence be damned.
Galileo Galilei
(1564-1642)Galileo also observed Saturn and saw something rather strange, something he described as "handles" protruding from the sides of the planet. His telescope wasn't quite powerful enough to make out Saturn's rings, and it was many more years before other, better telescopes became available to solve this mystery. Galileo's observations, his methods, and in particular his systematic way of gathering evidence, has led to his being described as the first scientist.
The focal point for a Galilean telescope'e objective lens falls on the viewer's side of the eyepiece lens, which means the viewed image is not upside-down, one advantage of this design. Galilean telescopes tend to have relatively low magnifications and narrow fields of view. Over time Galileo created longer and longer telescope tubes, and longer and longer focal length objective lenses. This resulted in progressively higher magnifications, along with progressively smaller fields of view. Also, very important, the lens grinding methods of Galileo's day were rather primitive, with problems caused by surface imperfections, errors of overall curvature, and air bubbles inside the lens material. Further, the issue of chromatic aberration had yet to be either identified or addressed. Present-day Galilean telescopes are rare. There are a number of ways to acquire an erect image without using the Galilean lens system, and because of great improvements in lens fabrication techniques, these methods are almost always used instead of the Galilean arrangement.Refraction, Dispersion, Chromatic AberrationAs mentioned above, our demonstration telescope is primarily meant to show its properties and ray paths and isn't really a very practical design for looking through. Nevertheless, on this page is a comparison of views of a reference target and the view through the eyepiece of this telescope. Here are the POV-Ray source files for these two views: For these particular POV-Ray source files, you will need to acquire a TrueType font (to draw the characters in "Target"), the name of which appears on line 75 in each of these files. I cannot simply provide a font for download as most are copyrighted. There are several sources for free TrueType fonts on the Web, and (of course) there are suitable fonts available on a typical Linux installation. In the default POV-Ray setup, the font must be in the same directory as the POV-Ray source file. The two target view graphics (direct and eyepiece) on this page are accompanied by angles. These angles, which can be specified in the POV-Ray camera block, represent an easy way to gauge the overall magnification of a telescope within the POV-Ray virtual world. Although there are more formal, mathematical ways to make this determination that work both in POV-Ray and reality, and assuming the target in both images is the same size, and if the angles (a) are relatively small, the magnification (m) is very apporoximately equal to:
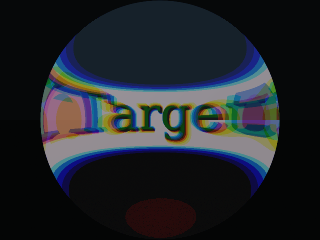
Direct target view (1.3°)
Eyepiece view (20°)I wasn't very careful to make the target image in the target and eyepiece views equal in size (wanting to show the full field in the eyepiece view), also the field distortion makes comparison rather difficult, but it appears this telescope has a magnifying power of about 10x. The eyepiece view has the curvature and distortion it does because of the relatively short focal length of our objective lens. The color fringing represents a simulation of the amount of chromatic aberration this kind of lens would have, when no effort is made to correct it.
m = aeyepiece
atarget(Note 1)
The color fringing in the view through the eyepiece of our simple telescope is a real effect, one that can be modeled using POV-Ray. This effect, called "chromatic aberration," is caused by the fact that light's speed through glass is wavelength-dependent. This wavelength dependence (called "dispersion") causes blue light to be refracted more than red light. In a POV-Ray source file, one can set a dispersion value in the "interior" block of a lens description, like this:ConclusionIn this entry, "ior" stands for Index of Refraction, which is the degree to which light is slowed down by that particular glass, while "dispersion" represents the degree to which the index of refraction is wavelength-dependent. For an in-depth discussion of these topics, read the Technical Discussion Page for OpticalRayTracer, my open-source ray tracing program. It was only over time that opticians figured out how to accommodate dispersion in their lens designs. Typically an optician will create two lenses composed of different kinds of glass, glass having different dispersion indices, and play one lens off against another to minimize this effect. There is an example design that shows this in the help file for OpticalRayTracer.interior { ior 1.5 dispersion 1.01 }
A free program like POV-Ray can be used to create first-cut designs of optical equipment such as telescopes, or as an instructional aid in teaching optical principles. With patience and care, plus some knowledge of optical physics, a student can use POV-Ray as a classroom aid (or a virtual playground) and learn all sorts of interesting things.Footnotes
Note 1 On the strength of this relationship:
| Home | | Computer Graphics | | Adventures in Ray Tracing | | | | Share This Page |