Share This Page
| Home | | Computer Graphics | | Adventures in Ray Tracing | | | | Share This Page |
Something to reflect onWe will now take the image description shown in the prior page and add some things, in order to show their effect. This page shows changes in the surface appearance of the objects. Here is the new listing:
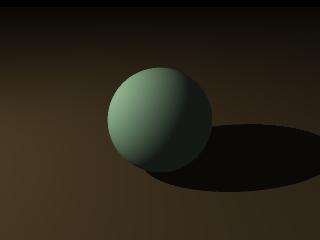
Click this image to see the changes
described in the text
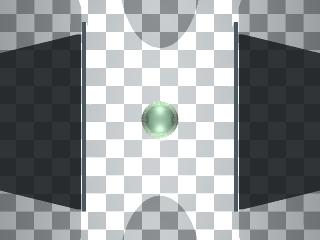
An overview of the classic mirror experiment --
two mirrors facing each other
Click this image repeatedly to see
an increase in the number of reflectionsLook carefully at this new listing and compare it to the prior one. There are several changes. The code block identified as "plane" at the top has a new section called "finish," which refers to the surface appearance of an object. This specific finish entry tells the object to reflect 30% of the light that falls on it. Below that is a changed entry for "pigment," which is a general term for colors and patterns of color. In this entry, the keyword "checker" is used to produce a checkerboard pattern. Two colors are provided for alternating squares in the checkerboard. This produces a pattern that one can see in a reflection, and that serves for orientation if the camera position should change. Furthen down the listing, under "sphere," we see another "finish" entry. This one contain a new term — "specular." "Specular" refers to a surface highlight, a special kind of reflection from a light source. Also, like the plane, this object now reflects 30% of the light that falls on it. Click the image on this page to see the effect of these changes. Notice that we now see a reflection of the sphere on the plane, and (because of the checkerboard pattern) we can see the plane reflected in the sphere. And please experiment on your own — make some changes to these values and see the outcome of your own experiments.
The astute reader will notice something about this example. If the plane makes a reflection, and if the sphere also makes a reflection, some of the reflections from the plane will hit the sphere and be reflected back to the plane, ad infinitum. How does the program ever stop running? The answer is that the renderer knows not to reflect infinitely many times. Click the third image down on this page to see the effect of an increase in the number of reflections. Notice that each image shows a black square, which is the distance (and number of recursions) at which POV-Ray stops reflecting light. And click here to show (and acquire) the POV-Ray scene description file responsible for this display. Notice in this listing, third line down from the top, the entry "max_trace_level 24". This entry is reponsible for the final, deepest level of reflections in the mirror experiment. I created the mirror experiment scene description file using KPovModeler. After a certain level of detail has passed, it becomes much easier to make a modeler program handle the details for you — this relegates the low-level tasks to a program, freeing the human to concentrate on the more creative aspects of this kind of work. Hey, wait a minute, that sounds like the reason to have a computer in the first place. :) Again, I ask that you perform some of your own experiments. Satisfy your curiosity about the properties of these scene description files. And get accustomed to visiting the POV-Ray documentation site for a greater level of detail than I provide here.
| Home | | Computer Graphics | | Adventures in Ray Tracing | | | | Share This Page |