

 Share This Page
| Home | | Programming Resources | | | | Share This Page |
I realized it was time to face reality
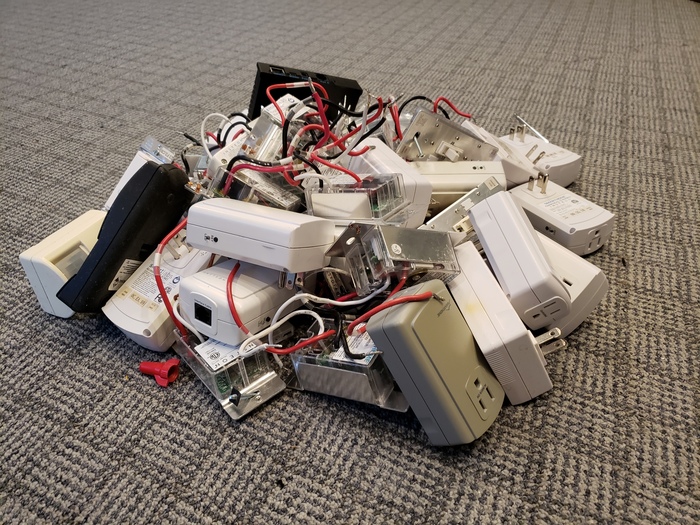
Figure 1: My pile of old Insteon parts,
on its way to the dump (explanation below)
— P. Lutus — Message Page —
Copyright © 2022, P. Lutus
Most recent update:
My earlier Home Automation articles:
Home Automation | Home Assistant / Insteon Rescue
This article's topics:
(double-click any word to see its definition)
This Article's Goals
In this article I describe my abandonment of the Insteon line of home automation products, explain home automation systems from a DIY perspective and describe how to set up a modern Z-Wave based system without reliance on corporate or cloud entanglements. The technical parts assume a certain familiarity with computers and hardware, but even without those skills it's a worthwhile read.
Readers may fairly ask whether I'm qualified to technically describe a mixed hardware/software project like home automation, so ... I designed electronics for the NASA Space Shuttle, then changed career paths and wrote some well-known computer programs (details). With that said, let's get started!
Insteon's Collapse
In Spring 2022, with no advance warning, the Insteon company collapsed and shut down their Web server. Most Insteon users, reliant on that server, watched their home automation systems go offline and become inoperative.
Since then a group of dedicated Insteon users have taken over some parts of the company, the Web server in particular, restoring service to many, but with the understanding that Insteon will be a paid subscription service going forward.
Insteon's collapse sparked a run on all Insteon parts sources and in some cases prices became ridiculous, even for used parts of questionable value. A number of companies have expressed interest in taking over the product line and supplying new parts, but after months of negotiations there's no resolution.
Months later, used Insteon parts are being offered for sale on Ebay at absurd prices, even though these parts have a finite lifetime and may be unsafe (details below).
Replacing My Insteon Network
Until last week I relied on a large Insteon network with about 30 wall switches and many other devices, in a multi-story house. This was my third Insteon-wired house in a time span of four decades, including a predecessor technology (X10) from which Insteon grew. This means I first adopted Insteon when it was the hot new technology, and I later wrote a comprehensive Insteon guide.
Because I avoid cloud-based services, my home automation network is free of online entanglements, which means I didn't notice Insteon's collapse until it became a tech news story. On receiving word of the collapse I decided to wait to see what happened. Maybe someone would pick up the pieces, restore the company and in particular start providing replacement parts (the part of Insteon I did care about). That was many months ago and hope is fading.
So ... to cut to the chase ... I just replaced my entire Insteon system with its most popular (not to say common) successor, Z-Wave. I chose Z-Wave primarily because of its popularity and the number of competing vendors.
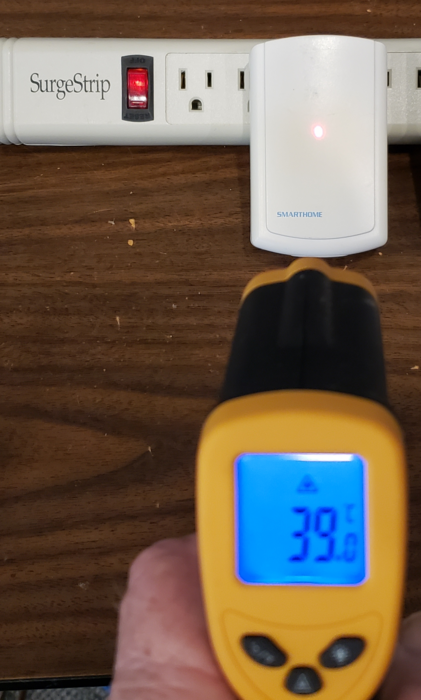
Figure 2: Old Insteon component
temperature reading
(39°C = 102°F)Old Insteon Parts
My successful Z-Wave conversion project produced a large pile of Insteon parts (Figure 1), some operational, some not, but all old, some decades old. Some may wonder whether I considered putting these parts up for sale online, as many have done. Well, no, for several reasons:
These devices have a finite lifetime, largely determined by the presence of electrolytic capacitors, which over time degrade and (apart from making the device less reliable) begin to dissipate electrical energy as heat.
Aware of this factor, I took some temperature readings and noticed many of my older Insteon devices were running quite hot, like 39°C hot (that's above body temperature) (Figure 2).
I realized, at that externally measured temperature (implying much higher internal temperatures), these devices waste power 24/7 while doing nothing, and pose a fire hazard as well.
So according to my personal ethical standards and a strong wish not to be sued, not selling these devices became a moral imperative — I'm dumping them in the trash where they belong.
Sidebar: Before going on I want to address a safety issue with my readers — if they have an Insteon network older than, say, five years, please run this test:
Remove the cover plate from a wall switch and measure its temperature.
If readers don't have a non-contact thermometer (Figure 2) for an accurate reading, just touch the switch's metal parts. Is it warm to the touch?
If the device's outside surface is warm to the touch, that means (apart from wasting electrical power) its internal temperatures are much higher, and readers should replace the device before it burns their house down with them inside it.
Even though they perform the same functions, Insteon and Z-Wave networks differ greatly. Insteon relies on low-frequency (130 KHz) networking signals carried by house wiring, while Z-Wave relies on a 900 MHz fully wireless network. In principle this makes Z-Wave 7,000 times faster than Insteon, while in practice it means Z-Wave doesn't have a speed limit forced on it by its network carrier frequency.
More recent Insteon networks also have some 900 MHz components for otherwise-insoluble problems, but the 130 KHz house-wiring network does the heavy lifting. For a small Insteon network of 10 or fewer devices this low-frequency network doesn't present an insurmountable obstacle, but as more devices are added, the system begins to break down.
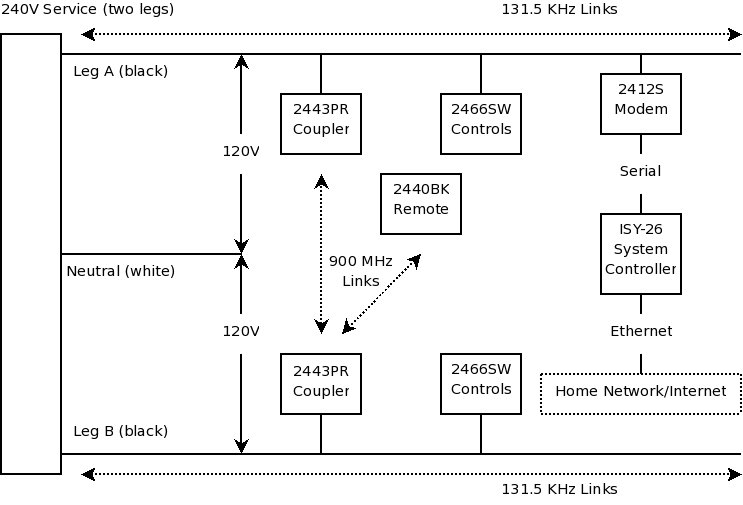
Figure 3: Insteon house-wiring network
Insteon House-wiring Network
One of the primary weaknesses in the Insteon power-line network is that American houses have two separate wiring legs, each of 120 volts, physically isolated (Figure 3). This makes it possible to run a major appliance like a clothes dryer on 240 volts, by connecting it directly across the two elevated wiring paths (legs A and B in Figure 3). For most normal house wiring, a given outlet/switch/appliance is connected to just one of the 120 volt circuit legs.
This means for Insteon, which relies on house wiring for transmitting signals between devices, a device located on one circuit won't necessarily hear signals emitted by the other circuit. An extra-cost partial remedy exists using special circuit-bridging devices (Figure 3, "2443PR" couplers) that:
- Read 130 KHz network house-wiring packets on one wiring leg,
- Convert the 130 KHz packets to a 900 MHz form,
- Transmit the 900 MHz packets between coupler modules, then
- convert the packets back to 130 KHz house-wiring signals on the other leg.
This rather expensive remedy never worked very well, but it made a two-leg house-wiring network at least possible.
Light Sources, Old and New
When Insteon was the new thing, most houses had incandescent lamps — a simple tungsten filament enclosed in a glass bulb. This primitive light source had many drawbacks, but because of its simplicity it didn't emit any interfering signals across house wiring, signals that would have interfered with Insteon network traffic.
Then compact fluorescent lamps (i.e. CFLs) came along, with advantages over incandescents in efficiency and service life, but with a drawback — each contained an efficient power converter, a converter that emitted energy at or near 130 KHz, which interfered with Insteon network traffic. I can remember the experience of turning on a CFL device on my Insteon network, but because of the resulting interference, being unable to turn it off again.
Those CFL devices have since been replaced by LED lamps, even more efficient than CFLs and with longer service lives, but these new devices also have internal power conversion circuits that emit radio-frequency energy onto house wiring — energy that interferes with an Insteon network.
Summary
Because of its basic design and its reliance on low-speed power-line signals, Insteon was a slow-responding network in the best of times. Over time the electrical noise caused by modern lights and appliances have made Insteon networks increasingly erratic as well as being outperformed by its newer competitors in both usability and price. These issues were factors in Insteon's collapse.
I think it's time to say R.I.P., let's move on.
In this section I explain why my Z-Wave-based home automation setup avoids online "cloud" services, prepackaged/predefined home automation products, and why it relies instead on a DIY outlook, personal involvement in the details, and a willingness to get one's hands dirty.
The majority of modern home automation systems are packaged, predefined, professionally installed and entirely reliant on cloud resources. These systems impose a monthly fee for continued access. They aren't very expensive to acquire, but they're very expensive to operate in the long term.
Digression: Software as a Service
Modern, prepackaged, cloud-reliant home automation systems are just one example of a major change in how people relate to companies and products.
At some point in the past few decades, corporations realized that selling products outright was a loser's game. Real money was made by turning a product into a service, a service the customer had to pay for again and again, in perpetuity. Ownership was replaced by license — the customer didn't own the product, he "owned" a revocable license, with periodic fees.
As one example Microsoft is moving away from selling software, toward offering what is called "Software as a Service" or SaaS. In SaaS the customer has to buy the product over and over again, forever. But it gets better — if for some reason the customer fails to make the required payments, he loses access to the software his documents require, and therefore loses access to his documents.
Car companies are adopting their own version of SaaS. As one example, a company now rents people the right to heat the seats in their cars on a cold winter morning. If they don't pay the rent, they get no heat — in their own car. God, I wish I were making this up, but no — it's real: BMW starts selling heated seat subscriptions for $18 a month.
Ink-jet printer manufacturers are another notorious example. The manufacturer practically gives away the printer, but the required and short-lived ink cartridges are hugely expensive. Printer manufacturers do all they can to keep people from refilling their proprietary ink cartridges with cheap ink, sometimes going to court to stop people from providing printing ink at its true cost.
Some may think SaaS is a new thing under the sun, a new twist on out-of-control capitalism, but in fact it updates a tradition from the seamy side of life — that between a drug dealer and drug addict. For the drug addict, the first dose is free, after which he has to rob people and break into houses to pay for the next dose, and the next.
To work as intended, SaaS relies on people's mathematical ignorance — people can't figure out why the product is so cheap. The answer, of course, is that it's not cheap at all, but the true cost lies in the future, not the present. SaaS exploits the obscuring horizon imposed by people's inability to think long-term.
The Cloud
Then there's the role of "the Cloud": online storage and services, which often work hand-in-hand with SaaS. Cloud-based storage and services have many drawbacks apart from the fact that people have to pay for access in perpetuity. One drawback is the notorious hackability of cloud servers, which can expose people's most private moments to ransom-demanding criminals. Another is the cloud's poor security and unreliability compared to a prudently designed local storage system. A third is the very real possibility that the cloud resource's operator will drop clients without warning, as Insteon did.
Fourth on the list is that one's online data falls under a set of legal rules entirely different from data people keep in their personal possession. Legal authorities have a much easier time gaining access to personal data if it's "in the cloud" than if it's in someone's house — access to the latter requires a warrant signed by a judge. In fact, legal authorities have a number of ways to access people's online data without either a formal warrant or revealing that they've gained access and are monitoring a person's communications and activities. In legal terms, a cloud service is neither a castle nor a private domain (and IANAL).
The Take-Away
In my view people shouldn't sign up for services they don't understand, and shouldn't rely on cloud-based home automation schemes. In modern times the ideal home automation system is private, with an optional, free, fully encrypted remote access method that's entirely controlled by the end user. This article explains how to get exactly that.
This section provides an overview of a fully user-controlled Z-Wave-based home automation system with no role for corporations or cloud services apart from an optional, free, secure communication pathway to a cell phone or tablet while the reader is away from home.
Here's a diagram of a user-configured (non-corporate) Home Automation system:
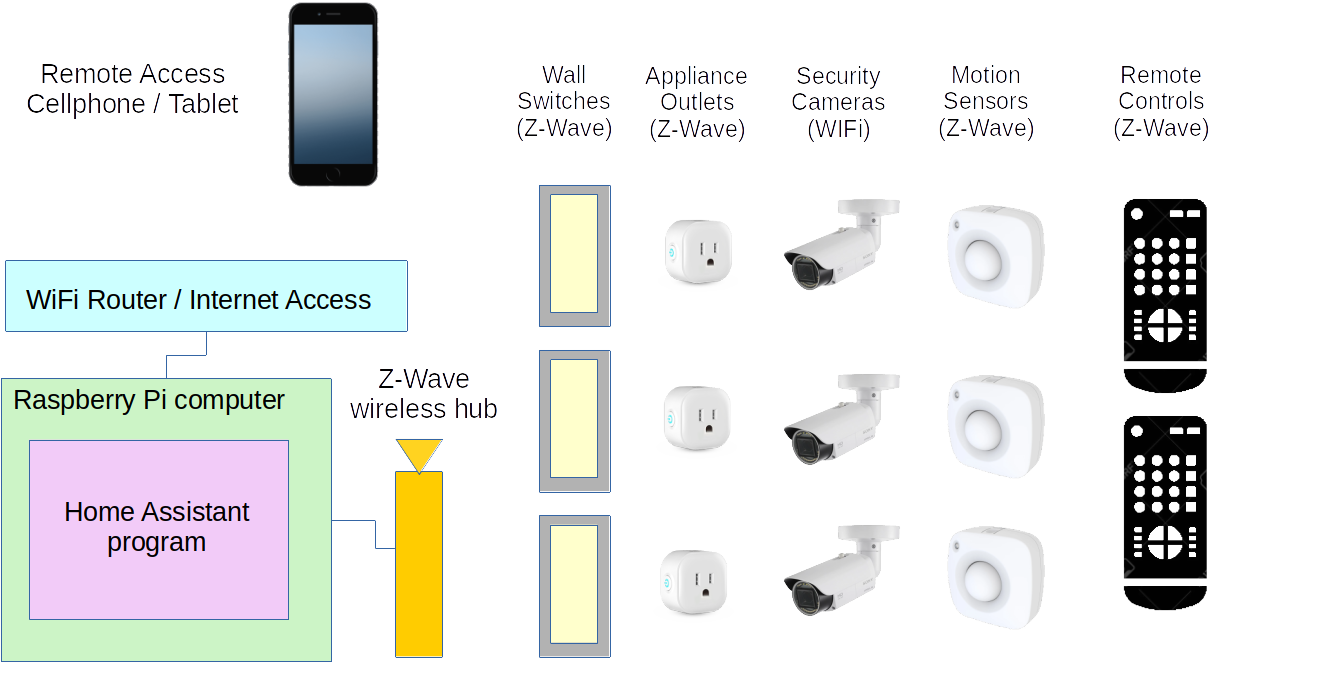
Figure 4: Home Automation system overview
Here's a breakdown of Figure 4:
First, the number of devices shown is just an example — I have 30 wall switches in my system.
The controlling logic, the "brains" of the system, is a free, open-source program called Home Assistant.
A small, inexpensive computer called a Raspberry Pi (or equivalent) runs Home Assistant (there's no need for a larger, more expensive computer).
The "Z-Wave Wireless Hub," normally a small USB stick, ties together most parts of the home automation system. Controlled by the Raspberry PI computer and Home Assistant, it communicates the user's instructions to the Z-Wave components and receives information in return.
Special Z-Wave wall switches replace any conventional switches the reader wants to control automatically.
Z-Wave-controlled appliance outlets plug into normal house outlets and allow readers to control most kinds of electrical devices.
Security cameras use the local WiFi network to transmit images to the Raspberry PI and Home Assistant, for viewing and recording.
Z-Wave motion sensors detect people's movements, then activate lights and other things.
Z-Wave remote controls can be used to direct the house network by pressing buttons.
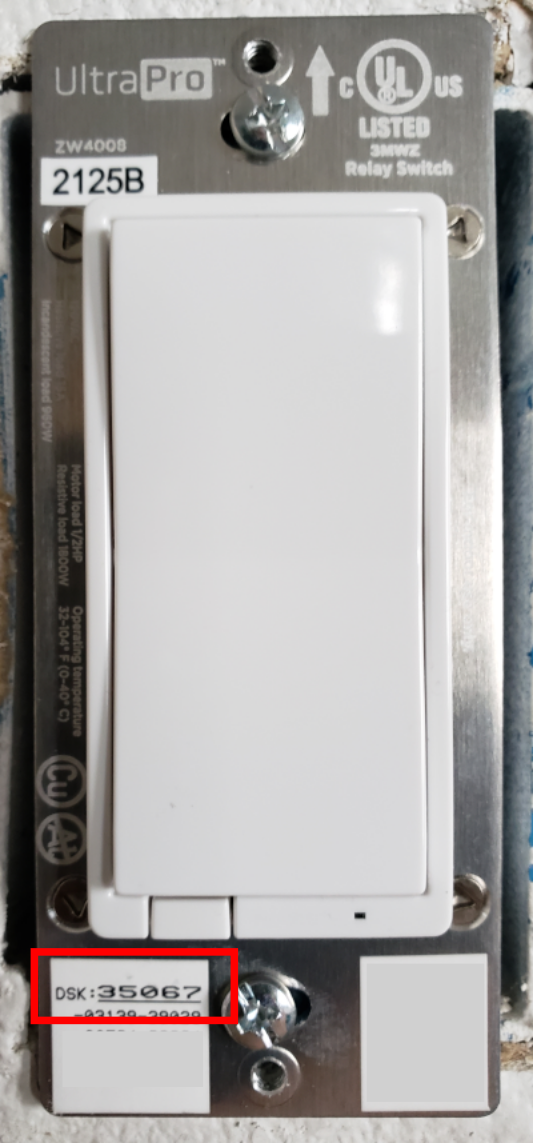
Figure 5: The security
code numberIt's desirable to have some Z-Wave hardware available in advance of installing and activating the Home Assistant computer and management software. As shown in the Open-Source Methods section above, a typical Z-Wave home installation includes wall switches and appliance outlets among many other options.
Let's focus on wall switches because they can be a challenge to install correctly and safely. Consider these points:
- Many available Z-Wave wall switches are simply junk. The attractions of the Z-Wave home automation market are too tempting for seamier hardware manufacturers, many of which get listed alongside better, more reliable brands.
- I'm not going to make a specific recommendation, instead I suggest that readers consult online reviews of the available offerings, in particular negative reviews, to see what kinds of experiences people have with a specific product.
- As to installation, if the reader isn't familiar with electrical systems and procedures, by all means hire an electrician to install the wall switches.
- For readers skilled with home electrical systems, I suggest caution anyway — always remove electrical power from the work site, and be sure to test the wiring for activity before commencing work.
- And finally, with regard to Z-Wave wall switches, each has a code number that the Home Assistant Z-Wave integration will ask for during the activation process, as part of an optional Z-Wave security method.
- What this means in practice is that readers need to either (a) record these code numbers while installing the wall switches, or (b) leave the wall covers off the switches (to make the code numbers visible as in Figure 5) until the hardware installation and Home Assistant software integration process is complete.

Figure 6: Z-Wave
hub extended away
from the hosting
computerAs to the all-important Z-Wave hub:
- As with wall switches, quality varies greatly from vendor to vendor — read online reviews carefully, negative reviews in particular.
- A large Z-Wave hub, or one that supports multiple protocols, is not necessarily better than a small, less expensive device in the form of a USB stick (Figure 6).
- At the time of writing, the new 700 series Z-Wave hubs have some problems with dropping devices or losing track of them. This is a software issue and will likely be resolved eventually, but at the time of writing, readers may be better off choosing a 500 series Z-Wave hub.
- For a complex network in a large house, to improve communication with distant devices, it may be desirable to separate the Z-Wave hub from its host computer using a USB extension cord as shown in Figure 6. This has the beneficial effect of physically separating the hub from the computer, a potential source of radio-frequency interference.
Apart from wall switches, there are many more kinds of Z-Wave and WiFi devices available:
- Motion detectors (Z-Wave) that, once programmed into Home Assistant, can turn on lights and appliances or set off alarms in some circumstances. Some of these devices also measure temperature and humidity.
- Magnetic door and window open/closed sensors (Z-Wave), which can be used to confirm the state of one's house accesses or detect intrusions.
- Security cameras and camera-equipped doorbells (WiFi) that can be used to monitor the reader's home while traveling, or detect intruders. Some of these can be programmed to automatically record video upon detecting movement. These devices are easily integrated into Home Assistant.
- Remote controls (Z-Wave) that can be used to direct media centers and appliances in ways not possible with ordinary household switches and controls.
Event Sequence
A Do-It-Yourself (DIY) Z-Wave Home Assistant project follows this general sequence:
Acquire a Raspberry Pi 4 or newer, or equivalent from another maker, small computer.
Flash an image of the Home Assistant software onto a micro USB device and plug the device into the Pi.
Connect a keyboard and monitor to the Pi and power it up.
Once the Home Assistant operating system has prepared itself, begin a detailed setup procedure.
These preparation steps normally run in parallel with hardware installation, example wall switches and appliance adaptors, some of which require a bit of effort as well as attention to detail and safety issues.
Many components in an up-to-date home automation system are easy to install, example battery-operated motion detectors — these devices require little installation effort and can hardly go wrong. Wall switches are a different story — they must be installed carefully, with attention to wiring details and color codes, all with power removed. Some readers may choose to hire an electrician for this specific task.
After the hardware has been installed and linked to the Z-Wave hub, the technical phase begins — telling Home Assistant how to control the reader's devices. This part of the setup requires some immersion in details and much online reading. If done patiently and with attention to detail, it's also the most satisfying.
So ... let's get started.
Acquire a Small Computer
As I write this, the default small computer to host Home Assistant is a Raspberry Pi 4 described here, but (a) over time newer, better models will appear, and (b) there are alternatives that meet this project's requirements, example a recent Odroid model will work. I mention Odroid as an alternative only because the Home Assistant installation page has an installation package designed for this computer — a Raspberry Pi is still the best choice.
For this phase, along with the computer be sure to acquire:
- An appropriately sized power supply module. An inadequate power supply is a common issue with this class of small computer.
- A protective case, since this computer is likely to be be put into service then stored somewhere convenient, but not necessarily an ideal protected environment for a small computer.
- A micro USB storage device, 32 GB or larger, to store the Home Assistant operating system and its data.
Prepare the Micro USB Device
In this phase we acquire the Home Assistant program and write it to the previously acquired micro USB storage device:
- Go to this Home Assistant installation page.
- Follow links to the installation package appropriate to the reader's chosen install environment. It should be pointed out that installing to a Raspberry Pi is just one of many options, IMHO the best overall.
- Assuming a Windows host platform, this Raspberry PI installation page offers detailed instructions to use Balena Etcher to write the Home Assistant software to the previously acquired micro USB storage device.
- Perform this operation carefully — choose the right storage device. It's possible to erase the computer by choosing the wrong device.
- There are many other ways to prepare an installation/operation storage device, this is the most common.
First Run
Before powering the Raspberry PI or equivalent small computer:
- Plug the micro USB device into the Raspberry Pi.
- If at this stage the reader has acquired a Z-Wave hub, plug it into the Raspberry Pi also.
- Connect the Raspberry PI to the home network using an Ethernet cable. It's possible to set up Home Assistant using a wireless connection, but:
- If the wireless network requires a password, it won't be possible to enter the password unless the reader has connected a keyboard and mouse to the Raspberry PI in advance.
- Even if the wireless network doesn't require a password, a wireless-network installation is very much slower than an Ethernet-wired installation allows.
- Connect the Raspberry Pi to its power supply.
- Within a few minutes the Raspberry Pi will become available on the local network:
- On Windows, open a browser and click this link (homeassistant.local:8123).
- On older Windows systems or those configured with extra security, try this link instead (homeassistant:8123).
- As a last resort, type into a browser the IP address of the Raspberry Pi (http://xxx.xxx.xxx.xxx:8123). Replace the 'xxx' sequences with the Raspberry Pi's IP address. This more difficult fallback method probably won't be necessary.
The above automatic setup and software-installation procedure can take as long as 20 minutes depending on choice of computer and network speed.
The above procedure is also explained on the Home Assistant setup pages.
User Account and Initial Configuration
Because of the many changes in Home Assistant over time, I recommend that readers follow the official Onboarding Home Assistant instructional page for this phase. This is because as Home Assistant changes, so does its detailed setup procedure. The official instruction page should stay synchronized with the software, but this page likely won't.
At the end of this phase, the reader will have created an account with Home Assistant and be prepared to install something Home Assistant calls an "Integration". For our purposes this will be software to interact with household Z-Wave devices.
Z-Wave-Specific Setup
In the hardware acquisition section above this section, the reader will likely have acquired a Z-Wave hub, usually in the form of a USB stick. If this device is not yet plugged into the Raspberry Pi, plug it in now.
To install the Z-Wave integration module, using the Home Assistant user interface:
- Select Settings (gear icon) at the lower left.
- Select the Devices & Services menu item.
- Click the "Add Integration" button at the lower right.
- In the "Search Integrations" entry, enter "z-wave", just as shown.
- One of the resulting choices will be "Z-Wave".
- There will be four or more alternatives, but for this simple setup, choose "Z-Wave".
- In many but not all cases, a dialog will appear with a check-box marked "Use the Z-Wave JS Supervisor Add-on". Select this choice and press "Submit".
- Once this integration has been installed, a tabbed page will appear offering options for the next step.
- One of these tabs will be "Configuration". Select this tab.
- The Configuration tab should show a list of possible locations for the Z-Wave hub, with the most likely candidate preselected.
- If the preselected choice is correct, simply press ""Save" and this integration will proceed to scan the home network for Z-Wave devices.
- During this automated scan, the integration will ask for access codes for many of the installed Z-Wave devices. If the reader has followed the process outlined in the hardware acquisition section above, these codes will have been recorded in advance of installing switch wall plates, or will remain visible until the installation is complete.
- For manual device installation, in the Z-Wave integration page, select "Add Device" at the lower right, then activate the target Z-Wave device to make it visible to the Z-Wave hub. For a wall switch, turn the switch on and off, other devices have similar activation/identification methods.
Default Control Methods
Once the Z-Wave and WiFi devices have been integrated into Home Assistant, the reader can use the Home Assistant user interface to control the house, either at a laptop or by using a phone or tablet. The Home Assistant operating system has many ways to create control panels and displays that conveniently show information and accept control inputs.
Z-Wave Computer and Hub Placement
Once Home Assistant has been set up and is running satisfactorily, consider relocating the hosting computer (the Raspberry Pi in the above examples) and the Z-Wave hub to a better location:
- Walk around the house until at a location that minimizes the distance to all Z-Wave devices — a location with the smallest distance to the greatest number of devices.
- Relocate the computer and Z-Wave hub to that spot, or as near as practical.
- This step maximizes the reliability of one's home automation network, because all Z-Wave devices must be able to communicate with the Z-Wave hub.
For more exotic and powerful (advanced) control methods including automations, be sure to read the next section.
This is an advanced topic. Readers without a computer programming background may want to wait until they've become familiar with Home Assistant before trying the methods described here. There are online Home Assistant discussion boards to assist those learning Home Assistant programming.
Terminal & SSH Add-On
To prepare Home Assistant for advanced configuration and development, first install the "Terminal & SSH" add-on:
- Go to Settings ... Add-Ons.
- Click the "Add-On Store" link at the bottom right.
- Search for "Terminal & SSH". To avoid installing the wrong add-on, enter the entire search string as shown.
- Install the "Terminal & SSH" add-on (and don't install the "SSH & Web Terminal" add-on).
- Once the add-on has been installed, select the "Configuration" tab.
- Enter a Secure Shell (acronym: SSH) password to permit logging onto Home Assistant using a command console (i.e. shell session).
- Advanced users familiar with Secure Shell should copy their public SSH key into the "Authorized Keys" entry. This allows logging in without having to enter a password for each remotely issued command.
- For the "Packages" entry, add names of desirable packages like rsync and others that aren't installed by default.
After the configuration steps are complete, return to the Terminal & SSH "info" tab and press "Start". By default this add-on will restart each time Home Assistant starts.
Command-Line Access
To test SSH access, if running Windows use an SSH client program like WinSCP. If running Linux just open a terminal and log on:
$ ssh root@homeassistant.local

| |  | |                          /\           (_)   | |            | |
| |__| | ___  _ __ ___   ___     /  \   ___ ___ _ ___| |_ __ _ _ __ | |_
|  __  |/ _ \| '_ \ _ \ / _ \   / /\ \ / __/ __| / __| __/ _\ | '_ \| __|
| |  | | (_) | | | | | |  __/  / ____ \\__ \__ \ \__ \ || (_| | | | | |_
|_|  |_|\___/|_| |_| |_|\___| /_/    \_\___/___/_|___/\__\__,_|_| |_|\__|

Welcome to the Home Assistant command line.

System information
  IPv4 addresses for eth0:  192.168.0.xxx/24
  IPv6 addresses for eth0:  xxxx::xxxx:xxxx:xxxx:xxxx/64
  IPv4 addresses for wlan0:

  OS Version:               Home Assistant OS 8.4
  Home Assistant Core:      2022.8.6

  Home Assistant URL:       http://homeassistant.local:8123
  Observer URL:             http://homeassistant.local:4357

$
File Explorer Access
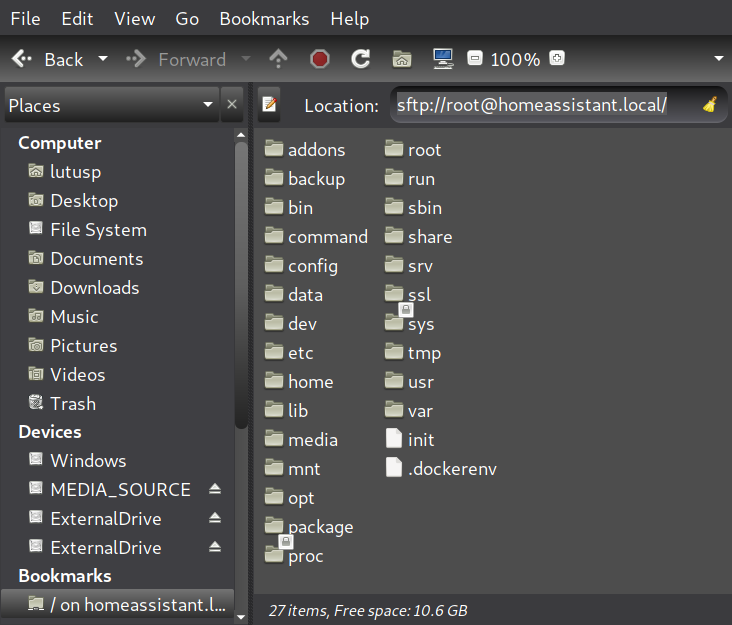
Figure 7: Linux file explorer (Caja)
showing Home Assistant filesystemAs with most things, Linux has better ways to communicate with Home Assistant than Windows does. Here's an example:
- Open a Linux file explorer.
- Make an address entry dialog visible (this varies from explorer to explorer).
- In the address entry, enter this: "sftp://root@homeassistant.local".
- In most cases, with up-to-date Linux versions, this will produce an interactive display of the Home Assistant file system (Figure 7).
- Be careful with this display — if the wrong items are deleted or changed, Home Assistant might need to be reinstalled.
- Become familiar with the file explorer display and save its location as a link for future use.
- Click the "config" directory name — this directory will be the focus of most of this section's Home Assistant configuration and programming activities.
Back Up the Home Assistant Configuration
Before we move into custom Home Assistant configuration and programming, let's learn how to make a backup, against the possibility of an operator error or a computer issue that might erase all prior hard work:
- In the Home Assistant user interface, select "Settings" ... "System" ... "Backups".
- Click "Create Backup" at the lower right.
- In the dialog that will appear, select "Full Backup", then click "Create".
- Editorial comment: Always create full backups. Full backups are typically smaller than 2 MB and partial backups make no sense.
The above action will create a backup file that can be used to recover Home Assistant from most kinds of crashes or operator errors. But the backup file should itself be backed up to at least one additional location. Here's how:
- Return to the Linux file explorer example above.
- Select, or enter, "sftp://root@homeassistant.local" as before.
- Click the "backup" directory.
- Within this directory the reader should find at least one backup file with a name composed of eight hexadecimal digits and the suffix ".tar".
- If there is more than one backup file, select the most recent one and copy it to another location.
- This step is essential to protect against a failure of the computer hosting Home Assistant and/or its storage device, in which case backup files located on the computer would be lost and one would have to start over from zero.
Windows Access Methods
While we're on the topic of file explorers, those running Windows are at a distinct disadvantage, both with respect to Secure Shell operations and direct file explorer access to Home Assistant. There is a convenient remedy — install WSL or WSL2, or install a Linux virtual machine, to have a Linux environment to work in.
Obviously readers could drop the other shoe, dump Windows and install Linux, but I know there are people out there who don't want to take this step ... yet.
Automation Examples
Editorial comment: YAML is a perfectly terrible markup language. It relies on whitespace for logical grouping, its syntax is ambiguous, and figuring out why a script isn't working can become a nightmare. The version of YAML included with Home Assistant has a number of non-standard additions to make it more like a real programming language, but in many cases those additions only serve to increase the confusion level.IMHO people would be much better off learning Python, which (although it also relies on whitespace for logical grouping), is an actual programming language, and an automation is, strictly speaking, a computer program.
And Home Assistant supports Python. Sort of.
The Home Assistant user interface includes ways to create automations of various kinds, but the primary Graphical User Interface (i.e. GUI) method only works for certain limited cases. As people acquire more experience writing automations, the time-honored hand-editing approach ends up producing better results.
A Home Assistant automation is a YAML script that waits for a certain trigger event, then carries out one or more actions based on that trigger. The scripts are written in YAML (stands for Yet Another Markup Language).
Here's an example YAML automation:
This example is one of my old Insteon automations. Its trigger event is the activation of any of three switches, on or off, and its action is to turn (on or off) the other switches — or appliance plugs — in the group. It essentially groups the three switches so they act in concert. Simply put, if any one of the switches is activated, this automation responds by putting all the other switches in the same state (either on or off).alias: join trigger living room description: '' trigger: - platform: state entity_id: - switch.switchlinc_relay_0b_ba_1d - switch.togglelinc_on_off_56_0f_2f - switch.togglelinc_on_off_58_20_91 action: - delay: 00:00:01 - service: "switch.turn_{{ trigger.to_state.state }}" target: entity_id: - switch.switchlinc_relay_0b_ba_1d - switch.togglelinc_on_off_56_0f_2f - switch.togglelinc_on_off_58_20_91 mode: singleThis is a very popular automation action. Its classic application is a staircase or hallway with light switches at each end, where both switches control the lights in the same way. In this specific case I had a group of light switches that I wanted to act as one, upon throwing any of three switches.
My new version of this script, for my Z-Wave network, eliminates the time delay, or in some cases makes it much shorter, because a Z-Wave network is much faster and more reliable than an Insteon network.
Here's another example. This script relies on a motion sensor to turn on a bathroom light, then — unless the motion detector is retriggered — turns the light off after five minutes:
alias: Motion Detector UBA
description: Activate Upper Bathroom lights on motion
trigger:
  - platform: state
    entity_id: binary_sensor.z_msuba_home_security_motion_detection
    to: 'on'
action:
  # turn on bathroom lights
  - entity_id: switch.uba1
    service: switch.turn_on
  # delay duration
  - delay: '00:05:00'
  # turn off bathroom lights
  - entity_id: switch.uba1
    service: switch.turn_off
mode: restart
Notice the final line of the script — "mode: restart". This means if the motion detector is retriggered by additional movement, the script and its five-minute timeout restarts. Only after the bathroom is unoccupied does the light turn off. This kind of script is useful for:
- Households with children, creatures for whom turning lights off is an alien concept.
- The elderly and infirm, who for various reasons won't or can't turn lights on or off, but who require reliable lighting for as long as necessary.
- Space cadets like me, who never remember to turn off lights.
Here's another, more complex example of a room light automation:
alias: MQTT Cam L1 Motion Detector Living Room Lights
description: Activate a specified light on detected motion, when dark
trigger:
  - platform: mqtt
    topic: cam_L1/ai_human_detection
    payload: 'off'
condition:
  # if sun within twilight/dark elevation region
  - condition: numeric_state
    entity_id: sun.sun
    value_template: '{{ state.attributes.elevation }}'
    below: 18
action:
  - entity_id: switch.lr1
    service: switch.turn_on
  - delay: '00:30:00'
  - entity_id: switch.lr1
    service: switch.turn_off
mode: restart
Here are the details:
- The source for the trigger event is a rather sophisticated (but not particularly expensive) security camera able to distinguish a person from a moth or a dog. Because of an unfixed software bug, only the 'off' signal is available, but this creates only a short time delay from 'on' to 'off'.
- In this example an associated condition must also be met for the action to be taken, and that condition is that the sun must be within 18 degrees of the horizon (morning or evening as well as nighttime). This setting can be adjusted to suit local conditions.
- In the action section, the script activates a light switch, waits thirty minutes, then (unless another human detection restarts the script), turns off the lights.
This example basically turns on the lights whenever they might be useful, but if the room remains vacant, reliably turns off the lights. I have a similar automation script with different settings for my outside security cameras. That script only activates the security spotlights when a human is detected, and only when it's dark. The camera ignores moths, dogs and deer, but bathes my house's exterior in light whenever a person approaches.
Programming Details
Readers will notice these scripts are independent and self-contained, they aren't part of a master automation file, which is the default setup on Home Assistant. This is because I have so many automations that the default single-file configuration is impractical. So instead of a single automations file, I have a directory containing individual automation files. Here's how to set this up:
- First, make a backup, so if something goes wrong, recovery is easy. Instructions above.
- Enter either a shell session or a file explorer pointed at the Home Assistant directory tree, details above.
- Select the "config" directory.
- Under this directory, create a new directory named "automations".
- In the "config" directory, edit the file "configuration.yaml" in any convenient way (a shell session user might enter the command "nano configuration.yaml").
- Change this line: "automation: !include automations.yaml"
- To this: "automation: !include_dir_list automations"
- Move individual automation files into the newly created directory.
- Reboot Home Assistant.
The same idea applies to Python programming, except that by default a directory named "python_scripts" exists and is recognized by Home Assistant as a Python script repository.
Remote Control Example
There are Z-Wave compatible remote controls available, for the truly decadent among us who can't be bothered to carry around a cell phone hosting the Home Assistant user interface, or who prefer mashing buttons. Here's the remote control I used for this example:
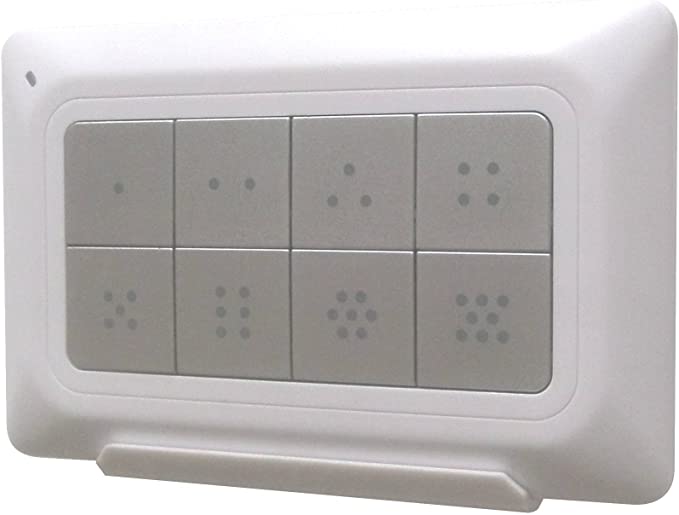
Figure 8: Z-Wave compatible Remote Control
This example is a bit more complex than those above. It needs two scripts, one YAML script to detect activation of the remote, and a Python program to decide what to do with the information (The YAML script calls the Python program). The reason for the Python program will become apparent.
Here's the YAML script:
alias: Remote Control Logic
description: 'Using python script, dispatch button presses from remote controls'
trigger:
  - platform: event
    event_type: zwave_js_value_notification
    event_data:
      node_id: 40
action:
  - service: python_script.remote_control_logic
    data:
      key: "{{ trigger.event.data.property_key }}"
      doubleclick: "{{ trigger.event.data.value }}"
mode: single
And here's the Python script (which should be located in the "python_scripts" directory and be named "remote_control_logic.py":
# This code (c) Copyright 2022, P. Lutus
# Released under the GPL
# https://www.gnu.org/licenses/gpl-3.0.en.html

# lists of entities to map to remote control buttons
# each sub-array can have multiple entity entries as required
# remote:
#   single-press = on
#   double-press = off

entities = [
    ['fd1'], # button 1: front door / western exterior
    ['lr1'], # button 2: living room
    ['cr1'], # button 3: computer room
    ['rr1'], # button 4: radio room
    ['mb1'], # button 5: master bedroom
    ['gl1'], # button 6: galley
    ['mr1'], # button 7: lower level
    ['all'], # button 8: all devices on/off
  ]

key = data.get("key")
doubleclick = data.get("doubleclick")
index = int(key)-1 # zero-based
# test for double-click indicator field
off_mode = doubleclick.find('KeyPressed2x') != -1
# create on or off state
action = ("turn_on","turn_off")[off_mode]
for entity in entities[index]:
  if entity == "all":
    # issue this command unconditionally
    hass.services.call("switch", action, {"entity_id": "all"}, False)
  else:
    hass.services.call("switch", action, {"entity_id": f'switch.{entity}'}, False)
Notice that the YAML script passes two specific variables to the Python script — "property_key" and "value". The first identifies which of eight buttons was pressed, and the second contains a string saying whether the user action was a single or double press of that button. In this configuration, a single button press means 'on' and a double press means 'off'.
If readers using this script need to activate more than one network entity with a button press, simply add more entity identifiers to the sub-arrays in the "entities" array at the top. Like this:entities = [ # ... ['fd1','lr1','cr1'], # ... ]With entries like this, the Python code will activate all the listed controls to the same commanded state.
Editorial comment: This isn't a lot of Python, and it's easy to understand, so someone might wonder whether the logic could have been written entirely in YAML. Well, yes, that could be done, but it would be a huge script, a sad waste of storage space and very difficult to change if new requirements arose.
The bottom line is that YAML was never designed for computer programming — it's supposed to contain data, not instructions. Someday people will figure this out.
In this section I explain how to make a home automation network accessible from anywhere, with good security, but without paying anyone for the privilege and without corporate cloud entanglements.
Dynamic DNS
This plan involves several steps. First, a home Internet service usually has an ever-changing IP address, so we need a way to make that IP address accessible automatically without detective work. For this, we need something called "dynamic DNS".Many dynamic DNS services exist, I'll describe DuckDNS because they're reliable and well-known, and Home Assistant works with them seamlessly. Here are the steps:
- Go to http://www.duckdns.org/ and create a new account (which is free).
- Choose a subdomain name that's (a) available and (b) memorable. An example would be "mynetwork.duckdns.org", but once a subdomain is chosen, write it down.
- Also make a note of the provided token — it's the reader's password for future accesses to duckdns.org.
- Now, in Home Assistant, go to Settings ... Add-Ons ... click the "Add-On Store" button at the lower right.
- Search for "duckdns", there will be one result — install it.
- Once the add-on is installed, go to its configuration.
- Enter the DuckDNS token recorded earlier, and the domain name as well (example above: "mynetwork.duckdns.org").
- If the reader sees a dialog or checkbox asking to accept terms, confirm it.
- Start the DuckDNS service, then click the Log tab and see if any errors are listed.
Secure Password
Before we go on, because we're about to make the Home Assistant network world-accessible, to avoid hackers we need to create a dynamite login password. The password can't be an ordinary user-selected password, it must be strong — it cannot be composed of dictionary words or be brief:
- First, if the reader doesn't have a password manager yet, this would be a good time to start using one.
- Go to uuidgenerator.net and click the button marked "Generate a version 4 UUID". Copy the resulting string of characters (which will be unique and will look like more or less this: "f8afe79b-1dc4-496f-b831-a8b1d720043b") somewhere safe, like ... a password manager. If this password is misplaced, the reader will lose access to Home Assistant.
- In Home Assistant, click the circular icon at the lower left that shows the reader's initials, then go to "Change Password". Paste the new password directly into the entry (don't try to type it in).
Router Configuration
Now to configure the home network's router:
- In the local router, the goal is to forward a port from the local Home Assistant host system (port 8123) to the outside world (port 443). That's the essence of the change, but how to do this depends on the local router make and model.
- If the router owner's manual is available, look for "port forwarding" and similar terms in the index.
- Perform the actions required in the router's documentation to forward local port 8123, and the host computer's IP address, to external port 443.
Additional Steps
- Go to Settings ... System ... Network.
- Scroll down to "Home Assistant URL" and enter the duckdns.org domain name created earlier. In my above example it was "mynetwork.duckdns.org", but use the actual chosen name. This is a convenience to allow local devices and systems to access Home Assistant once its access becomes encrypted.
- Edit configuration.yaml as demonstrated earlier and add these lines:
http: ssl_certificate: /ssl/fullchain.pem ssl_key: /ssl/privkey.pem- Now reboot Home Assistant. After the reboot, the local Home Assistant installation will be available from anywhere using the DuckDNS domain name created earlier, with this URL form: "https://mynetwork.duckdns.org" — note in particular the "https://" prefix, which signifies secure, encrypted Web access.
- Unless, of course, the reader has forgotten that long complicated password, or is still not using a password manager.
Short Items
Here are some random observations that don't fit neatly into the prior categories.
Again, I try to avoid making specific purchase recommendations and I have no connection with companies that might profit from what I say. People should shop carefully and always read customer reviews, negative reviews in particular. I'm sure I make wrong choices at times, readers should avoid blindly following my advice.
Home Assistant has a fee-based cloud service — it's called "Home Assistant Cloud" and is located at the top of the menu one sees under "Settings." My advice is to ignore this "service", since the reader can get the same functionality for free using DuckDNS.org as explained earlier. I feel particularly strongly about this "service" because it tries to profit from the free programming efforts of any number of volunteer software developers, including me.
The video cameras I chose are called "Yi security cameras". At the time of writing they're US$31.25 per unit, but they have a drawback — their makers spy on the customer, sending user data across the Internet to a factory in China. The remedy for this issue is to install custom open-source firmware that disables the spying feature and adds new features. Were it not for open-source projects that resolve the security issue (example) I wouldn't have considered this camera at any price. Be sure to exactly match the camera's model number with the custom-firmware version, failure in this step can brick the camera.
The motion sensors I chose are called Zooz Z-Wave Plus motion sensors. At the time of writing they're US$30 and they're very easy to set up. They have a clever magnetic mounting base that requires only one mounting screw and allows the sensor to be rotated in two dimensions for aiming. I chose this specific model because it can be powered by either a USB charger or a battery. I rejected a similar battery-only model (with more features) because it requires a pricey non-rechargeable lithium battery that must be periodically thrown away and replaced, something I regard as a travesty. As before I'm not making a recommendation, readers should shop around.
Thanks for reading!
Readers should be sure to visit the Home Assistant Community discussion boards, ask questions and post observations.
| Home | | Programming Resources | | | | Share This Page |