

 Share This Page
| Home | | Climbing | | | | Share This Page |

Copyright © 2016, Paul Lutus — Message Page
Most recent update:
(double-click any word to see its definition)
NOTE: This content is obsolete — read this article instead.
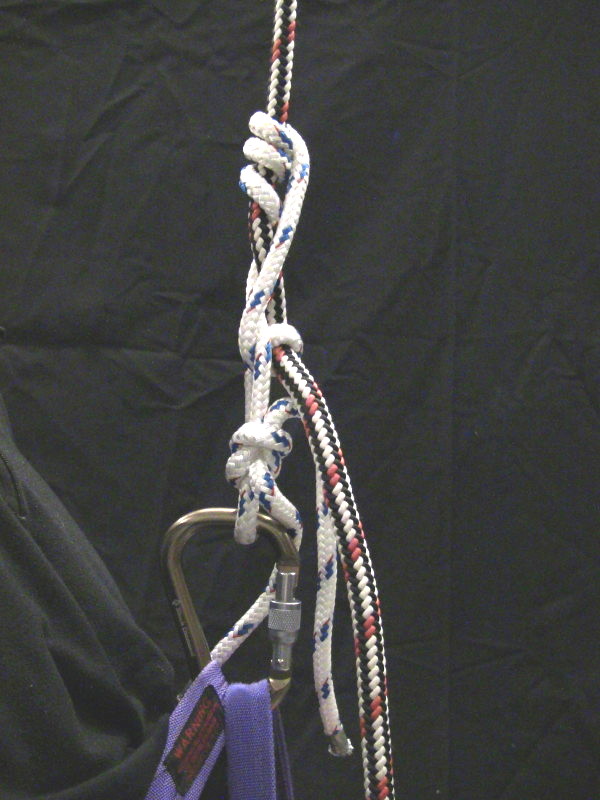
Figure 1: Climbing rig with a Distel Hitch |
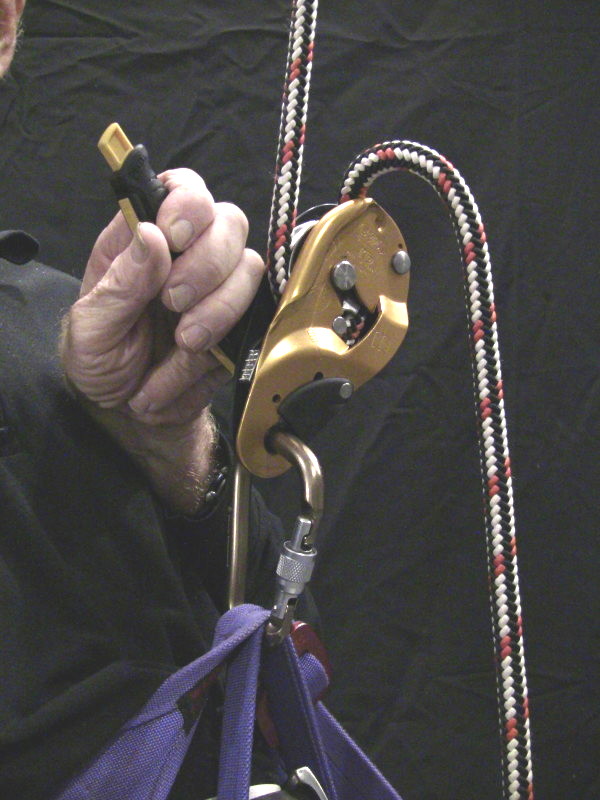
Figure 2: Climbing rig with a Petzl I'D S descender |
First, before we get started, read this disclaimer. I'm more than willing to discuss my climbing experiences and make recommendations, but if you fall, you're on your own.
Personal Note
When I was two or three years old, a certain low-life relative of mine held me over a precipice and threatened to drop me. My screams would have set off car alarms had they existed back then. Over the years I've come to see that a lifelong paralyzing fear of heights came directly from that experience, but I didn't see a way to overcome it.
Well, guess what, boys and girls? Taking up single rope ascents has had a beneficial, not to say transformative, effect on my attitude toward heights. For decades I would approach cliffs and high places, irrationally thinking my father would drop me for sure this time. But as this article shows, I've recently trained myself to trust a stout rope, my equipment and my skills, so I can look straight down from a great height, perfectly confident that the rope will hold me. To put it simply, I've replaced a lifelong irrational fear with a justified confidence in my equipment and skills based on reason and experience.
Before training myself in single rope ascents, I would watch YouTube videos of experienced climbers ascending ropes to great heights, thinking to myself, "How do people do that? If I climbed that high I would freeze up and rescuers would have to save a quivering mass of Jello." But the experience of ascending a rope that you know can support the mass of a Volkswagen, assisted by devices whose operation you fully understand, over and over in perfect safety, gradually confers a rational confidence based on experience.
It's not a perfect world and this experience is a mixed blessing — now I trust ropes, but I still don't trust people.
Context
This page is mostly about single rope technique ascents and descents, both on steep surfaces and suspended without support.
About a year ago, I lost a quadcopter in a tree (a story told here). The tree was about 24 meters (80 feet) tall but had no limbs below about 18 meters (60 feet). I wanted to recover my nice drone, but it wasn't obvious how I would ascend a bare tree trunk.
In spite of my fear of heights I've done a lot of climbing over the years, including some technical climbing, but I had never tried to apply those skills to a tall tree. I did some research and realized that, with the right equipment and some nerve, I could perform a single rope ascent, snatch the drone and descend, in relative safety.
I acquired a simple but adequate climbing rig and returned to the site with a huge slingshot meant to launch a light line as the first phase of an ascent (explained more fully below). As it turned out, the light slingshot line snagged the drone, which obligingly fell from the tree, thus depriving me of a climb I wasn't that enthusiastic about.
But since then, for a number of reasons, I've gotten much more enthusiastic about single rope ascents/descents of trees, suitable rappelling sites and elsewhere, for sport, exercise and to acquire new skills. On these pages I'll describe my experiences, show suitable equipment and offer some advice. I hope you enjoy this narrative.
Discussing descents before ascents might seem out of order, but beginners are more likely to try a descent, a rappell, before learning how to ascend a rope. Also descent equipment is simpler than a configuration able to support a safe ascent.
Ropes
Climbing ropes come in two primary types — static and dynamic:
- A static rope is designed to stretch as little as possible and is the preferred type to minimize wasted energy and for work environments in which position control is important.
- A dynamic rope is designed to stretch a certain amount. This feature is meant to protect a climber from the consequences of a fall that's arrested by the rope, which acts like a shock absorber.
- Beginners who want to minimize their risk, or who plan to climb for sport in natural areas, should acquire a dynamic rope.
- Beginners who want to work on a rope, who need to control their position accurately, or who want to minimize the effort of a climb, should acquire a static rope. But always remember that a static rope is inherently riskier in a fall.
Rope Size
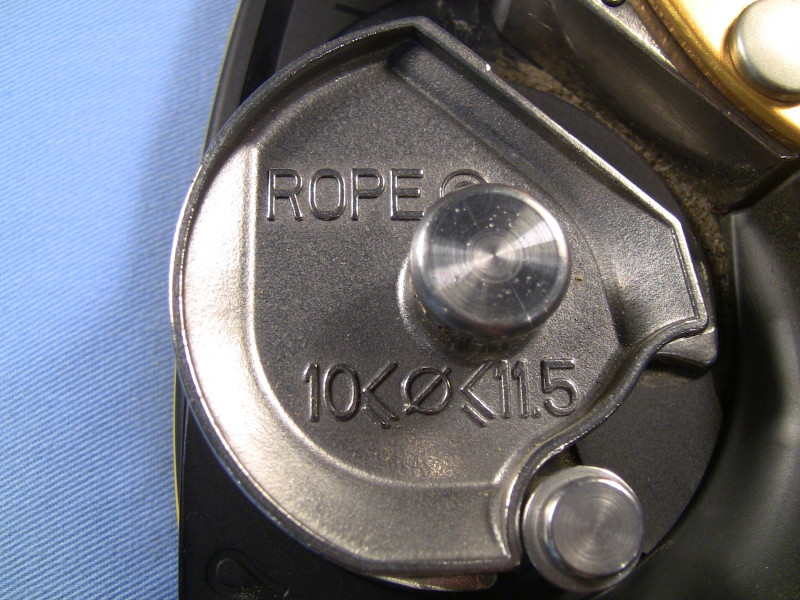
Figure 3: Typical rope size labeling (Petzl I'D S)
As one gets farther into technical climbing and rope work, it quickly becomes appparent that nearly all climbing hardware works best with a certain rope size. So, given the recreational focus of this article and unless the reader has a special reason for choosing a particular rope size, and in the context of the Petzl descenders to be described, I recommend an 11mm rope, which seems to be in the middle of the size range expected by common climbing hardware (see Figure 3).
As one acquires experience with modern descenders and begins to acquire field experience, the importance of rope size and whether it's a static or dynamic rope becomes more apparent. For the Petzl descenders described in this article, an 11mm rope seems optimal, but if there's any way to test a rope size (or several rope sizes) on a particular descender in advance of purchase, by all means take advantage of the opportunity. Connecting a descender to a rope and leaning back in a harness will tell you much more than any specification list or advertisement. If the line is too small it will pass through the descender without resistance, and unless you apply some tension to the free end you might fall. If the line is too large, it might not pass through the descender at all under specific circumstances.In one case in the field, my 1/2" (12.5mm) rope fell into some mud, which caused it to absorb some water and dirt and increase slightly in size. This made it completely unusable with my Petzl descender — the rope jammed in the descender mechanism and refused to budge.
Descent Methods
In the climbing physics section below I explain why a safe descent requires that the energy acquired in the ascent be dissipated, mostly as heat. This heat must be managed. If not dealt with properly, the heat can burn the climber's hands, his rope and/or his descent devices.
The basic idea of a safe descent is to moderate the rate of descent by controlling the release of energy, usually through a friction device. Here are some examples of friction descent devices, from primitive to sophisticated:
- Friction hitch.

Figure 4: Distel Hitch
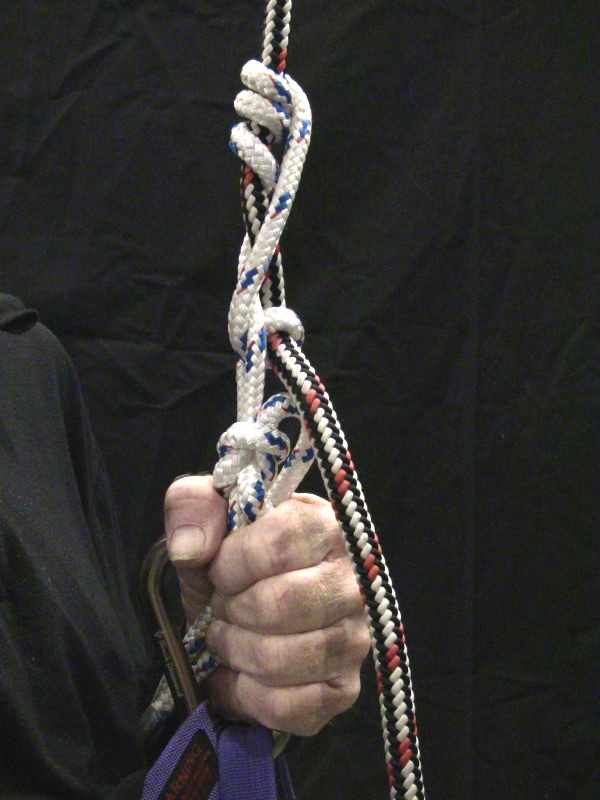
Figure 5: Distel Hitch under load
A Distel Hitch is one example of a friction hitch that, if rigged correctly, can be used to support a climber's weight and control a descent. It has the advantage that (if rigged correctly) if released it will halt the climber's descent. The climber controls a Distel Hitch descent by pulling down on the top of the hitch, which reduces its grip on the climbing rope and allows it to slide.
One drawback to a Distel Hitch is that it can bind up and refuse to release its grip on the climbing rope. Another drawback is that, in a fast or long descent, the hitch can overheat and melt, with potentially disastrous consequences.
Friction hitches often require fine tuning to work as intended, and should always be tested under load in advance of actually being used at height. And in the final analysis, this class of hitch is not a very good or safe way to descend.
- Figure-8 Descender
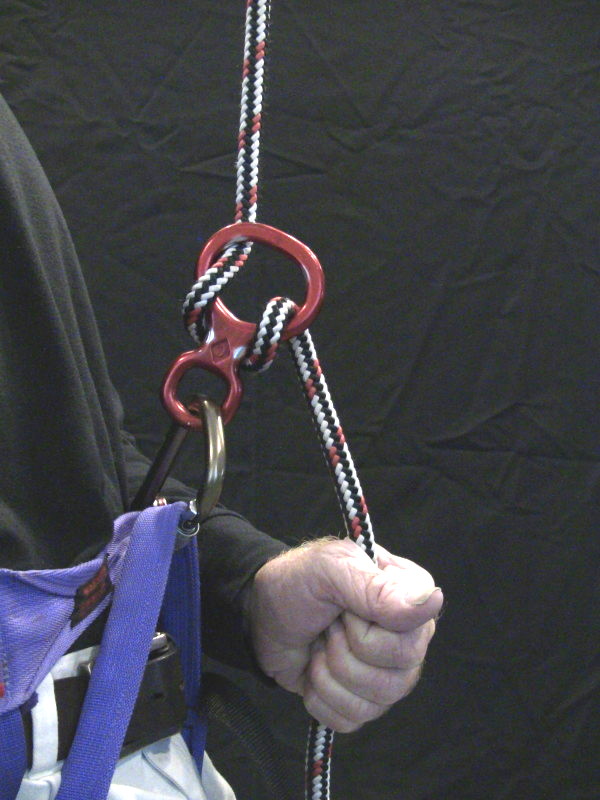
Figure 6: Figure-8 descender under load,
controlled by hand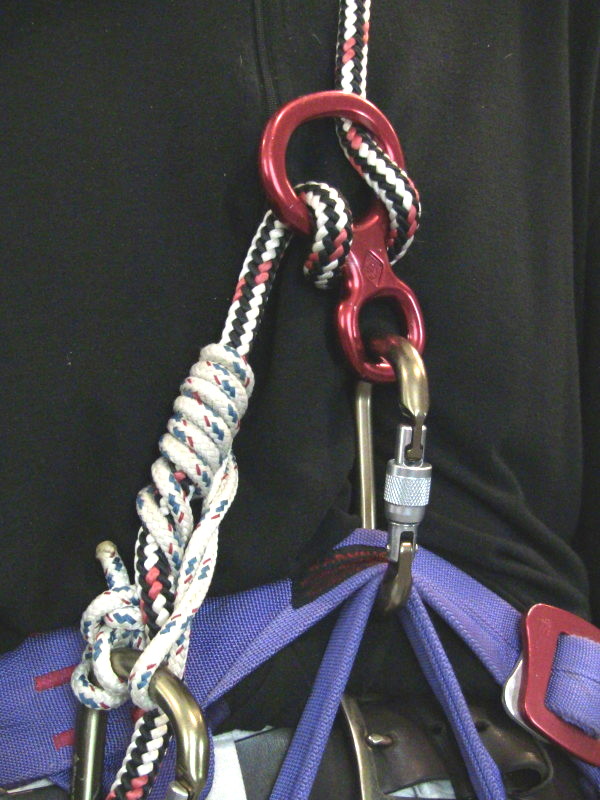
Figure 7: Figure-8 descender under load, controlled
by a Machard/French Prusik (lower left)The figure-8 descender is a traditional descent device with disadvantages that for some may outweigh its simplicity and low cost. The device is easy to rig, but it's also easy to drop while rigging. And in the classic configuration (Figure 6), the amount of force required to control the descent is high, and if the climber releases his grip on the rope, he falls. This means the climber has only one free hand to deal with issues during descent, and can't easily stop or pause while descending.
Always wear gloves when using a figure-8 descender in the traditional configuration (Figure 6) — the amount of force on the climber's hands is high.
A remedy for the figure-8's drawbacks is to pair it with a Machard/French Prusik (Figure 7, lower left). The Frenck Prusik controls the descent rate while handling only a small percentage of the descent energy, so the hitch isn't likely to melt under load like the Distel Hitch method described above. Also, very important, if the climber releases his grip on the French Prusik, the descent stops. This means the climber can have both hands free if needed.
The climber controls descent by pulling down on the top of the French Prusik hitch, thereby reducing its grip on the rope. This combination of figure-8 descent device and French Prusik to control descent can, if rigged correctly, produce a good, smooth descent with complete control, and the advantage that the climber can stop the descent by simply letting go.
- Advanced Descenders
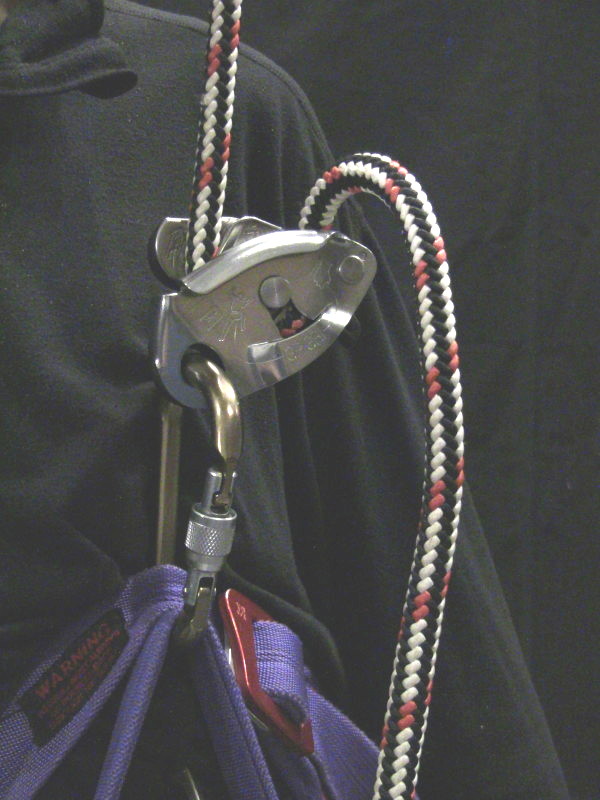
Figure 8: Petzl GriGri descender under load
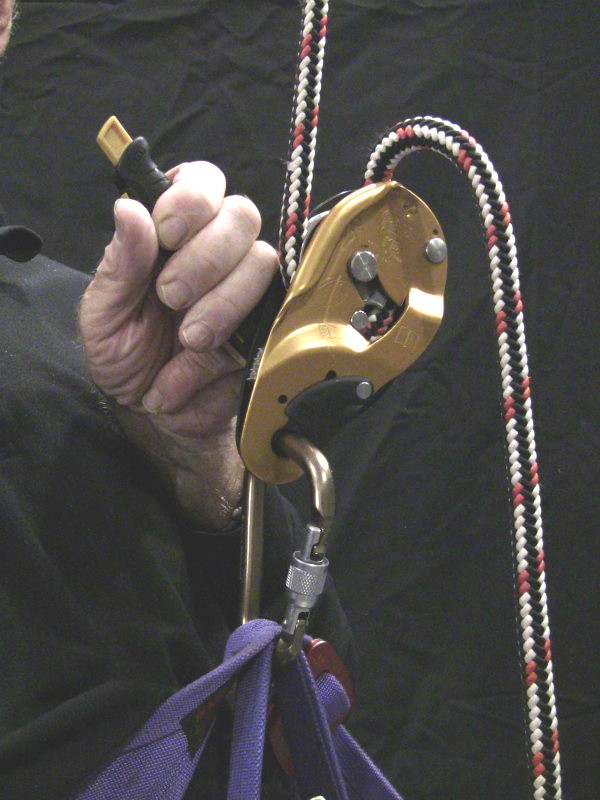
Figure 9: Petzl I'D S descender under load
Advanced descenders have many benefits — they can dissipate a lot of heat wthout failing, most have failsafe features that stop a descent if the climber releases his grip, and they can usually be integrated into a unified ascent/descent rig that allows a climber to change direction with little or no reconfiguration.
The Petzl GriGri (Figure 8) is a smaller, less expensive version of the Petzl I'D S (Figure 9). The GriGri has a descent handle (not visible in Figure 8) the climber can use to control his rate of descent. Compared to the I'D S, the GriGri's "sweet spot" (the control handle's available range for smooth descent) is smaller — some might say it's nonexistent by comparison with the more expensive descender. In most cases descending with the GriGri requires one hand on the descent control handle and one hand on the rope, so it's a bit inconvenient to use.
The Petzl I'D S (Figure 9) is a rather expensive, but very good, descent device. Its descent handle has a number of features that add to usability and/or safety. The control handle's "sweet spot" is wider and more meaningful than for the less expensive GriGri model. And the control handle has a panic-off feature that halts the descent if the climber pulls the handle too hard.
Unlike the I'D L (a similar Petzl model not shown here), the I'D S has an openable gate, which means the climber can attach and detach the climbing rope while the descender remains safely tethered to a carabiner.
Both the GriGri and the I'D S allow the climber to change direction very easily, in some cases without any configuration change at all. That means calling these devices "descenders," as their manufacturer does, is a bit misleading — they work just fine as the central element in an ascent/descent configuration that has every advantage over having to re-rig in order to change direction.
Now for the somewhat more complex task of ascending a single rope. To address ascent methods, we should assume the most challenging circumstance — the climber is suspended only by the rope and has no nearby surfaces to help in the ascent. I suggest this because in a mixed-terrain climb that includes unsupported ascent as one possibility, if the equipment can't function in that mode, the climb stops. Also, the reader should remember that my original reason for taking up single line ascents was to get up a tree that had no limbs to assist a conventional climb, so from the outset, I knew an unsupported ascent was the problem to be solved.
Unsupported Ascent
The most efficient equipment for unsupported ascent takes advantage of all the climber's limbs — both arms, both legs. But for reasons of practicality or economics, many climbers use a configuration that exploits fewer limbs in the effort. Here are some devices designed to assist an unsupported ascent:
- Hand Ascender
A rope clamp hand ascender relies on a gripping cam that the user engages and disengages from the rope. This kind of ascender is available in right-hand and left-hand models.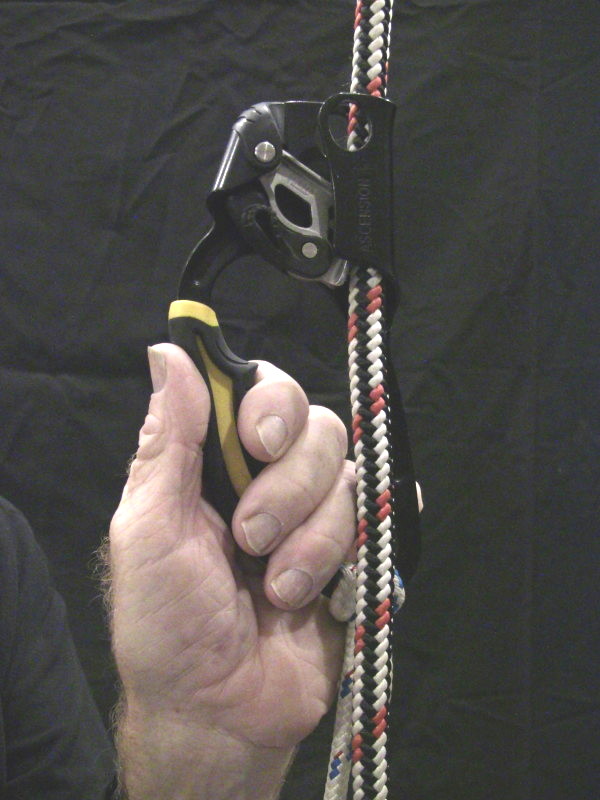
Figure 10: Petzl rope clamp hand ascender
- Chest Ascender or "Croll"
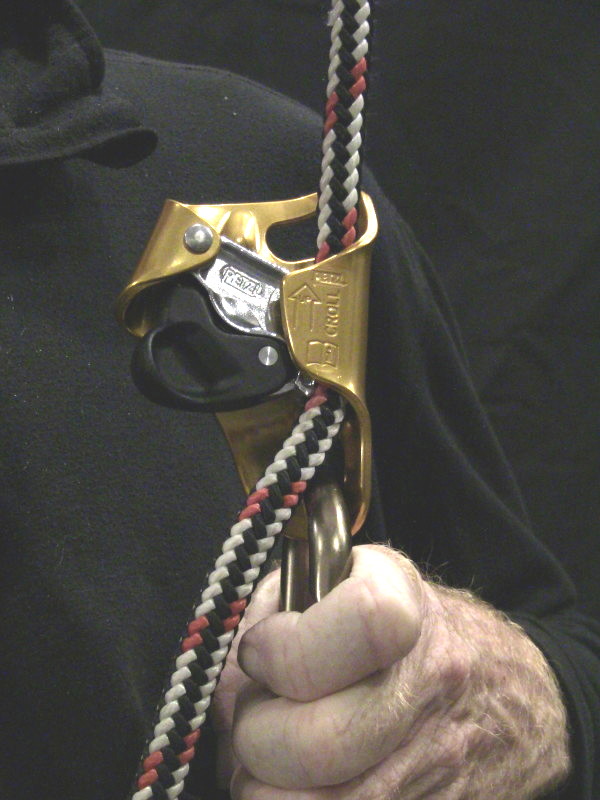
Figure 11: Petzl chest ascender/Croll
This device is normally attached to the midpoint of a climbing harness. In a single rope ascent it's configured to cooperate with a hand or foot ascender as the climb progresses. It can also be used as a fall arrester in a technical-climbing setup, in which the user passes a safety line through the device as he ascends using conventional climbing methods.
- Foot Ascender
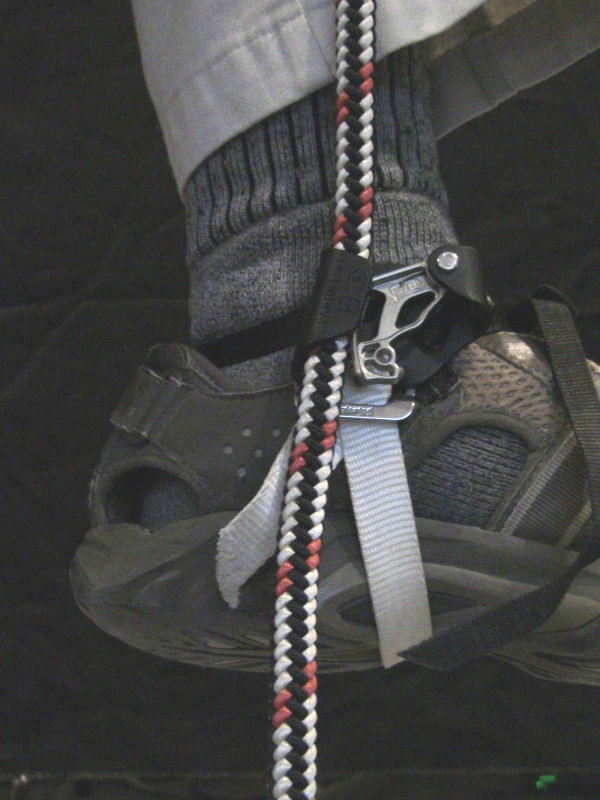
Figure 12: Petzl foot ascender
This device, available in right and left foot models, is meant to cooperate with hand and/or chest ascenders and takes advantage of the climber's leg strength to assist the ascent.
- Descender used as ascender
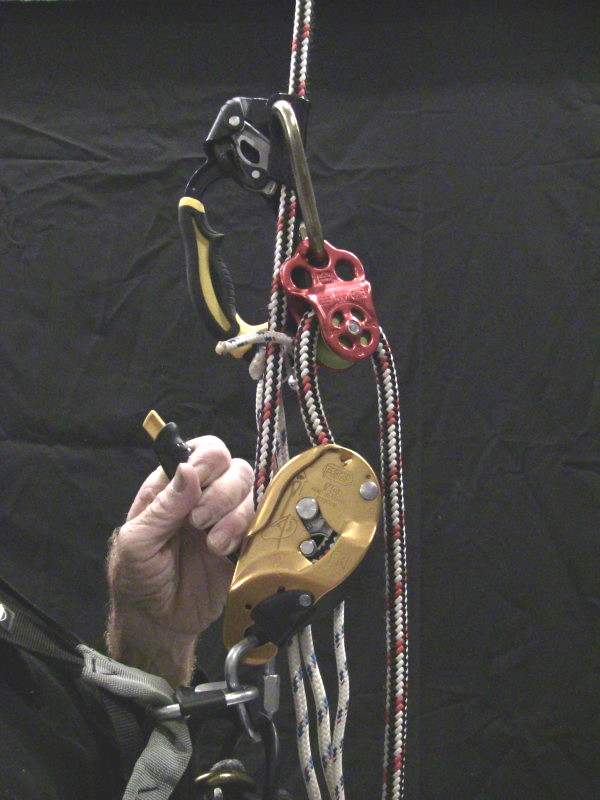
Figure 13: Petzl I'D S mated to pulley
and hand ascender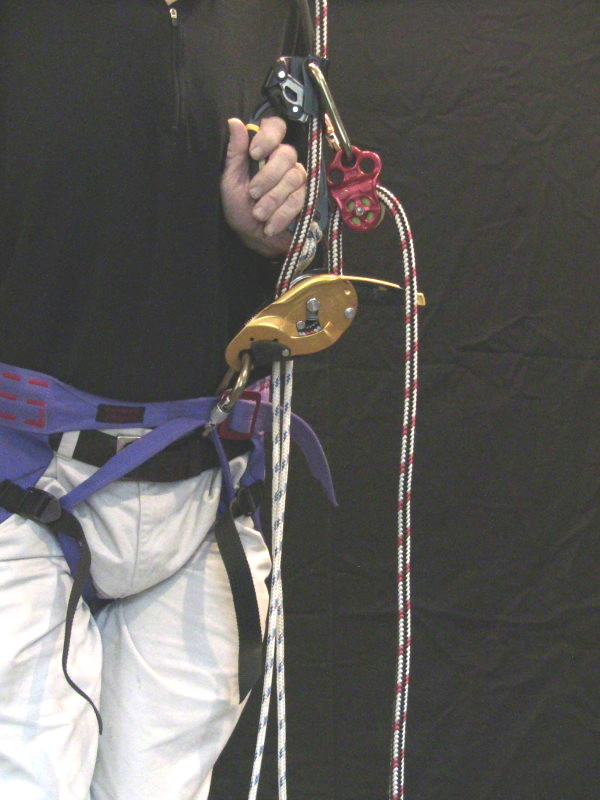
Figure 14: Wider view showing foot lines
attached to hand ascenderThis configuration exploits the fact that the Petzl I'D S descender works equally well as an ascender, which allows a single setup to work for both ascent and descent with little or no reconfiguration required.
Figure 14 shows two lines attached to the hand ascender leading to foot loops for assistance during the climb.
In practice, the climber pulls the hand ascender downward with arm and leg effort, which causes the I'D S to slide up the rope, then the climber slides the hand ascender up the rope and repeats the process.
The purpose of the pulley is to give the climber a 2:1 mechanical advantage when pulling the rope exiting the pulley. In practice, the climber ascends by pulling with both arms and legs, so this setup maximizes efficiency and distribution of effort.
In this setup, to change directions the climber need only disengage the hand ascender and let it slide freely along the rope, then operate the I'D S descent clutch — very simple.
While learning single rope ascent I've tried all the schemes and devices shown above. While testing a combination of hand ascender and chest croll for ascent and figure-8 device for descent, I saw that changing directions was a major undertaking that included the risk of dropping something essential to the descent. This got me thinking about the advantages of a clutch-based descender like the Petzl I'D S.
For a while I thought using a foot ascender along with a hand ascender would give optimal results, but after acquiring the Petzl I'D S I realized that foot loops attached to the hand ascender was a more practical configuration that allowed a very easy change of direction (i.e. just disengage the hand ascender).
This section relates mostly to preparations for ascending a tree, and the problem of lofting a rope to a desired height for ascent. For short climbs it may be possible to simply throw the climbing rope over a tree limb, but for any higher ascent the process has multiple phases:
- Use some kind of launcher to propel a light, weighted line over the target limb.
- Use the light line to lift the climbing line into position.
- Climb.
Launchers
I've used hand slingshots with limited success. The idea is that if one uses a light enough line, such as a monofilament nylon fishing line with a small weight tied to the end, the line can be lofted to a substantial height. The problem is that the weight often tends to be deflected by leaves and not get to the intended target.

Figure 15: Loading a weighted line into a huge slingshot
(Click image for full size)After some experimentation I settled on the setup shown in Figure 15. At first glance it sounds pretty crazy — a 250 centimeter (eight foot) pole with a beefy slingshot fork at one end rigged with a very large rubber band. I modified my slingshot with a mechanical-advantage pulley and release setup (visible in Figure 15, lower right) to allow the big rubber band to be stretched much tighter than simple arm force would allow, and a trigger release scheme to facilitate accurate aiming and release at full stretch. This setup allows me to accurately place lines in at most 30 meter (nearly 100 foot) trees, more than enough height for my purposes.
This may surprise some of my readers, but there's some physics involved in climbing and descending, and since I do mathematical physics, I want to include some derivations that, in spite of their seemingly esoteric origins, are worth reading, for practical application as well as knowledge of physics.
(Readers who don't like math can skip ahead to the conclusion below.)
Gravitational Potential Energy
Remember these key points for what follows:
- To ascend, the climber must use energy from his muscles to overcome gravity.
- At the top of the climb, the acquired energy has the form of gravitational potential energy, energy implicit in the climber's position in Earth's gravitational field, which we calculate below.
- Then, to descend, the acquired energy must be dissipated, mostly as heat. This is why climbing ropes and descender devices heat up during descents.
- Energy is conserved — all the energy acquired while climbing is dissipated while descending.
Here is the classic gravitational potential energy ($PE_g$) equation that can be applied to any two masses:
\begin{equation} PE_g = \frac{-G m_1 m_2}{r} \end{equation}Terms:
- $PE_g$ = Gravitational potential energy, Joules.
- G = Universal gravitational constant.
- $m_1$ = Mass of one body (in this case Earth), kilograms.
- $m_2$ = Mass of the other body (in this case the climber), kilograms.
- $r$ = distance from the center of one mass to the center of the other, meters.
Equation (1) isn't particularly useful in everyday climbing, because it gives an absolute energy value (the total gravitational energy of a mass located at Earth's surface), and we're more likely to want an energy differential, for example the energy difference between ground level and a chosen climbing height, so we can compute the effort required to ascend, as well as the heat that will be dissipated while descending. For this purpose we can derive a simpler equation.
Differential Energy
First, let's write out the full form of the energy differential equation:
\begin{equation} E_{h} = -\frac{G m_{c} m_{e}}{h + r_{e}} + \frac{G m_{c} m_{e}}{r_{e}} \end{equation}Terms not already explained:
- $h$ = Climber's height above ground, meters.
- $E_h$ = energy required to ascend to height $h$, Joules.
- $m_c$ = Climber's mass in kilograms.
- $m_e$ = Earth's mass in kilograms.
- $r_e$ = Earth's radius in meters.
Simple Work Equation
To simplify climbing calculations, let's create a new term representing earth's gravitational acceleration:
\begin{equation} g = \frac{G m_{e}}{r_{e}^{2}} = 9.822 \end{equation}Terms not already explained:
- $g$ = Gravitational acceleration at Earth's surface in units of meters / second2 (physicists call this quantity "little $g$").
With little $g$ at our disposal, and given that we want an energy differential for a height $h$, we can write this greatly simplified equation:
\begin{equation} w = m g h \end{equation}Terms:
- $w$ = work, units Joules.
- $m$ = climber's mass in kilograms.
- $g$ = little $g$, derived in equation (3).
- $h$ = climb height in meters.
Ascent
Here's an example question using equation (4) — a climber with a mass of 82 kilos (180 pounds) ascends 100 meters (328 feet). How much energy does he expend while climbing?
$E$ = 82 * 100 * 9.822 = 80,540.4 JoulesNext question. A given climber can sustain a continuous power output of 2/10 horsepower. How much time will the climber need to ascend the full 100 meter height?NOTE: Power is the time derivative of energy and is espressed in watts. One watt requires a continuous energy expenditure of one joule over time (watts = joules / seconds). One horsepower = 746 watts, so 2/10 horswepower = 149.2 watts.
t = 80,540.4 / 149.2 = 539.8 seconds or 9 minutes.Descent
NOTE: As we transition from ascending to descending, pay close attention to the fact that all the energy acquired during the ascent must be dissipated during the descent, mostly as heat. This results from the law of energy conservation — energy cannot be created or destroyed, only changed in form.
Next question — let's say the climber wants to descend quickly, say, in ten seconds. How much power will be dissipated during the descent?
w = 80,540.4 / 10 = 805.4 watts.That's very likely to be too high a power dissipation rate for most descent equipment, and unless the climber is wearing gloves he's likely to burn his hands and possibly his rope. So the next question — how long will the descent take if the climber limits his power dissipation to 250 watts?
t = 80,540.4 / 250 = 322 seconds or 5.4 minutes.250 watts is still a lot of heat, but because most of it is dissipated along the length of the rope, it's more manageable than the earlier example. The climber would still be well advised to wear gloves (imagine having a small but powerful, 250-watt light bulb gripped tightly in your hand for five minutes).
This leads us to the first bit of common-sense advice — if you want to preserve your rope and your hands, limit your descent rate. The idea is that low power levels can be safely dissipated by radiation and convection, but high power levels can and will burn your rope and/or your hands. This factor is less important with modern mechanical descent devices able to dissipate heat efficiently, but will always be a limiting factor when descending using traditional methods like rope friction descenders as shown in Figure 1 above.
Calories Burned
What we call dietary calories are actually equal to what in physics are called kilocalories, and one Joule equals 2.39×10⁻⁴ kilocalories. Also, a typical person is only 20-25% efficient in turning calories into climbing energy. Let's use a typical efficiency 22% for our next computation.
In the above problem, as the climer ascended 100 meters, he expended 80,540.4 Joules. With an efficiency of 22%, how many dietary calories ($dc$) did he expend during the climb?
\begin{equation} dc = \frac{j \times 2.39 \times 10^{-4}} {0.22} \end{equation}So in our example problem, $dc$ = 80,540.4 x 2.39 x 10-4 / 0.22 = 87.5 dietary calories.
Single rope ascent is a very useful skill, a source of vigorous exercise, and a confidence-builder as well. In my view it's well worth the investment in time and equipment. I hope this article has provided a useful survey of the kinds of equipment that are available as well as some useful climbing configurations. Thanks for reading!
In no event shall the author be liable for any loss or damage including without limitation, indirect or consequential loss or damage, or any loss or damage whatsoever arising from injury or loss of life arising out of, or in connection with, the use of the information presented in these pages.
| Home | | Climbing | | | | Share This Page |
