

 Share This Page
| Home | | Android | | | | Share This Page |
Using an Android device as an offline, off-road GPS/mapping resource
Copyright © 2017, Paul Lutus — Message Page
Most recent update:
Here's a brief history of schemes I've used to navigate:

Figure 1: Handheld GPS display
- During my around-the-world solo sail, I navigated with a sextant or a relatively unsophisticated satellite method called "Transit" that predated GPS. I carried about 20 kilos of paper charts.
- As GPS became available, for field outings I began acquiring a series of increasingly sophisticated GPS receivers and correlated their results with paper maps I carried along.
- My more recent hand-held GPS receivers have graphic displays (Figure 1) and can be equipped with crude topographic maps, so no more paper charts.
- Now, while aboard my boat, I navigate with a combination of a GPS receiver and a laptop running OpenCPN, an open-source nautical navigation program that displays free nautical navigation charts.
My present GPS navigation use cases are (a) onboard my boat, pretty much taken care of with OpenCPN and free nautical charts, and (b) offline GPS navigation in natural areas, primarily Alaska where there's little or no Internet coverage.
Recent Android devices have very nice graphic displays, magnetic sensors and GPS receivers, so it has come to me that they're an obvious platform for this kind of navigation. This article describes my method for equipping an Android device with everything needed for offline navigation in natural areas — maps, software and methods — at minimum effort and cost.
Cost
This article differs from many of my software-related articles in that I suggest that the reader purchase a navigation program (costing US$6.00 at the time of writing) to get the full feature set and avoid having to look at advertisements while using the program. But the free version of the program in question (Locus Map) offers nearly all the features this project requires, so a fully free outcome (navigation program, maps, everything) is possible.
This project means I can finally retire my old handheld GPS receiver, which had only a single purpose, hosted primitive maps and weighed too much for what it offered.

Figure 2: The drawback
to raster graphcisGoogle Maps and Google Earth are available for Android devices. They provide a crude variety of topographic mapping and GPS navigation, but there are some show-stopping drawbacks:
- With a qualification provided below, users of Google Maps/Google Earth must have Internet access.
- The user can download some maps in advance of going into the field, but the downloads virtually never provide the right coverage and/or the right depth of detail for the intended use.
- The downloaded maps are in raster format (Figure 2). This kind of graphic is very large for its information content and doesn't scale properly.
- The user can add waypoints to the displayed maps, but only by opening a Google account, uploading the waypoints to Google's servers and sharing the information with the public. This feature also requires Internet access.
Editorial comment: The reason Google's mapping products don't work very well in the field, away from the Internet, is because their actual purpose is to display Internet-based advertising to the user, not provide navigation, which is only an enticing side effect.
The reason people use raster graphics in navigation programs is simply that they're easy to implement. Apart from this, they have nothing but drawbacks — they're very large for their information content, one must download a separate set of raster images for each zoom level of interest, and inevitably, when in the field one finds that the wrong images were downloaded — wrong area, wrong size, etc.. To put it bluntly, these drawbacks mean that Google Maps/Google Earth cannot be relied on for field navigation and route/waypoint generation and use.
Vector graphics
The alternative to raster graphics is vector graphics. Each picture element in a vector graphic is a separate vector, technically a line with a length and a direction. Vector graphics files are smaller than equivalent raster graphics, they scale very well, but they require more advance planning and they're not generally useful for photographic applications. But for navigation maps they're the preferred approach because (a) they're much smaller than equivalent raster images and (b) such maps tend naturally to be composed of a series of vectors — roads, elevation lines, etc. — so the result is of higher quality than a raster image could be.
OpenStreetMap (OSM)
OpenStreetMap (example map) is an open, international, charitable project whose purpose is to create and distribute mapping information to the public. OpenStreetMap began as a public-spirited project to deal with the fact that nearly all map information was proprietary and costly, or completely inaccessible.
Editorial comment: I personally hold the OpenStreetMap project in the highest regard. Whenever I read about cyber-criminals, about people's lives being ruined by online haters, about spam and phony repair centers taking money from gullible PC owners, I think about OpenStreetMap and how much good they're doing. I personally think OpenStreetMap is what the Internet ought to be — an earnest effort to provide useful and accurate information in the public interest. By the way, OpenStreetMap accepts donations.
Maps provided by the OpenStreetMap project can be had in many forms, one of which is vector graphics, the most efficient form that a navigational map can have. The provided maps cover the entire world and all detail levels. This project relies on the existence of these vector maps.
Project Goals
This project's goals are to make an Android device a tool for reliable field navigation in unincorporated/wild areas, using a high-quality topographic map display, and allow the creation and use of waypoints and routes, all without Internet access. The following elements are needed to achieve this goal:
- An Android device with a display large enough for navigational purposes, i.e. at least 5 inches diagonally measured if not larger.
- A reasonably inexpensive — or free — navigation program to display maps, read the Android device's GPS receiver and magnetic sensor, and allow the entry of and display of navigational waypoints.
- A set of vector maps that cover the area of interest.
About the list above, for item (1) I have a Samsung Galaxy S7 (5.1 inch (130 mm) diagonal display measure), and a Samsung Galaxy Tab S2 8.0 (8 inch (203 mm) diagonal display measure). I prefer the 8 inch display, but in some cases I can't carry the large device so I get by with the smaller display, even though it's definitely cramped for this particular application. I emphasize that I've only performed tests on these two devices, but this project should run on any available Android device if it has a reliable GPS receiver and magnetic sensor (for direction sensing).
For item (2) I suggest Locus Map, either the free version without certain nice but not essential features, or the pay version with all the features described in this article.
I have also tested this project's goals using OruxMaps, but there are some caveats/comments:
- OruxMaps is no longer listed on Google Play, which means there's a higher risk involved in acquiring and using the program.
- OruxMaps is harder to set up and use than Locus Map in a project like this one, but it offers essentially the same functionality.
- On the plus side, OruxMaps has no advertisements and is free (the author accepts donations).
This article only offers instructions for the use of Locus Map, but the same outcome can be gotten by hacking OruxMaps on your own.
The final item (3) in the list above (map acquisition) is covered in the following section.
This is a step-by-step procedure for setting up an Android device for field GPS navigation with no Internet access, using free, high-quality topographic maps and a well-designed program for display and waypoint management. Even though these instructions include specific steps, the user may choose to change some of the steps for a better outcome, in particular after some time has passed and some of the listed resources become unavailable or are moved.
First, for the setup phase, if you don't have an easy way to communicate with your Android device, install my free app SSHelper, a Secure Shell server that makes it easy to transfer files from a laptop or desktop to an Android device. OpenSSH works with Windows programs like WinSCP and others for efficient file transfers.
Next, acquire and install on your Android device the Locus Map program from the Google Play Store. The provided link is to the free version of Locus Map, which shows advertising and disables certain features like (if memory serves) the hill shading feature. I suggest that the reader download the free version at first, because this lets the reader perform the setup described here and see if the results are satisfactory before spending any money.
Here's a step-by-step procedure to acquire data for offline map display:
Acquire Vector-based Maps
If one is sufficiently ambitious one can create subsets of the worldwide OpenStreetMap archive (56 gigabytes in size) using map editing software, but for this project there's a much simpler method — download individual vector maps of selected U.S. states*.
Choose the states you're interested in and download the corresponding files. Each of the state maps is downloaded in a ZIP file. UnZIP each file (example: "Alaska.zip" becomes "Alaska.map") and place the resulting map files in a map directory on your Android device. Let's call this directory "VectorMaps" (just a suggestion — any directory name can be used).
* The above procedure can be used for non-U.S. locales in the same way.
Acquire Map Theme Files
"Map Themes" is shorthand for configuration files that specify which map features are displayed in the mapping program. Some map themes are arranged to let the user choose which map elements are displayed, and Locus Map supports this check-box configuration method. A map theme configuration is required to display, for example, elevation lines in a topographic display.
- For the above map source, and for the Locus Map program, use this download page to acquire map themes.
- Click this link to acquire the right theme set for the Locus Map program.
- UnZIP the downloaded ZIP archive and place the contents in a specific Locus Map directory, located at /sdcard/Locus/mapsVector/_themes/.
Acquire Terrain Elevation Data (Optional)
This optional procedure allows a feature called "hill shading", a convenient way to show elevation differences in a displayed map. This feature is more fully described below.
Go to this interactive map and click the rectangles corresponding to the areas for which you've downloaded maps. Each click triggers the download of a ZIP archive of elevation data that can be used to support "hill shading" and other similar features. If the resulting map shows gaps in elevation coverage, return to these instructions and add more rectangles.
For each ZIP archive downloaded in the step above, unZIP the archive and put all the files (a set of HGT files, example "N34W112.hgt") in one directory on your Android device — let's call this directory "ElevationData".
Terrain Elevation data can occupy a lot of storage space. Having visible terrain relief in the displayed map is a nice feature, but the reader may want to weigh the advantages against the drawbacks. My present collection of elevation files requires 1.3 gigabytes of storage, a good percentage of the total for the mapping project (5 GB of maps + 1.3 GB of elevation data = 6.3 GB altogether). Here's an image I saved while creating a required-tile subset for the elevation coverage I need for my maps (using QGIS, a terrific and free GIS tool):
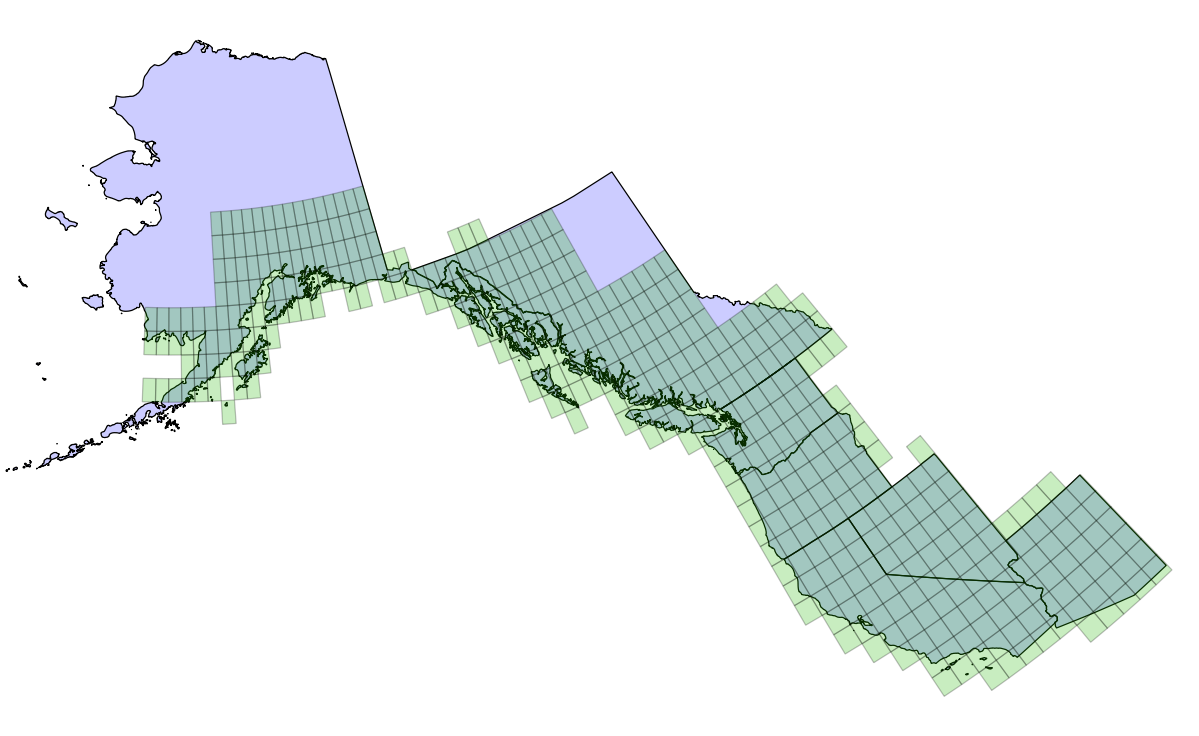
Figure 3: West coast/Canada/Alaska elevation coverage
The results of the above configuration steps should be placed in a set of new/existing directories on your android device:
- /sdcard/VectorMaps
- /sdcard/Locus/mapsVector/_themes/
- /sdcard/ElevationData
Note: The reason for creating separate directories to hold mapping data is so more than one program can access it, and the data won't be deleted if the user chooses to uninstall a particular program. This idea works for all except the themes directory /sdcard/Locus/mapsVector/_themes/, which is hard-coded into Locus Map and cannot be changed by the user.
At the end of the above installation process, the /sdcard/VectorMaps directory should contain MAP files, example Alaska.map, as many maps as you need.
The /sdcard/Locus/mapsVector/_themes/ directory should contain directories obtained from the unZIPped contents of your theme downloads, for example (only an example, your contents may differ):
The optional /sdcard/ElevationData directory should contain a set of HGT files — the listing should resemble this (again, just an example):
- Elements
- Elements LE
- Elevate
- Elevate LE
- ele_res
With the above steps completed, we're ready to configure Locus Map.
- N40W121.hgt
- N40W122.hgt
- N40W123.hgt
- N40W124.hgt
- N40W125.hgt
- ...
Offline Map Configuration
As a first step, give Locus Map the location of your offline vector map directory:
- Choose the Locus Map
menu icon at the upper left.
- Choose "Maps."
- Choose the "Offline" tab at the top of the screen.
- Choose the blue '+' sign at the lower right, and select the "External Maps" option.
- In the "External Maps" dialog that will open, choose the blue '+' sign at the lower right.
- Navigate to /sdcard/VectorMaps (or whichever name you gave to your vector map directory).
- The correct directory will show a list of map files, example Alaska.map.
- Confirm your choice by choosing the blue confirmation check-box at the lower right.
The result of the above procedure will be a list of offline maps in the Maps/Offline dialog. Choose a map to display — on choosing a map, the program will display it.
Map Theme Configuration
Now we'll configure a map theme, so such features as elevation lines can be shown.
- Choose the Locus Map
- Choose "Maps".
- Choose the "Offline" tab if it's not already selected.
- Choose "Select Theme".
Assuming the reader has configured the external themes described above, the Locus Map theme list should include:
- Internal Themes
- Hike & Bike
- Ski
- City
- Road
- External Themes
- Elements LE
- Elevation LE
Experiment with these themes, see how they work. Some themes allow the user to select specific features using check-boxes. The "Elevation LE" theme creates high-contrast elevation lines suitable for use in the field.
Hill Shading Configuration (Optional)
Assuming the reader has exercised the option of acquiring and installing elevation data in /sdcard/ElevationData as explained above, we can enable hill shading, a convenient way to distinguish different elevations in a topographic map.
- Choose the Locus Map
- Choose "Settings".
- Choose "Miscellaneous".
- Choose "Default Directories".
- Choose "Set /data/srtm/ directory".
- Navigate to /sdcard/ElevationData and choose "SELECT" at the lower right.
The above step gives Locus Map access to the elevation data files described above. Now to enable the hill shading feature:
- Choose the Locus Map
- Choose "Settings".
- Choose "Maps".
- Choose "Advanced Features".
- Choose "Map Shading".
- Choose "Enable" at the top right.
- Select all three map categories and choose "Hill Shading".
Now return to the map display to see the result. Here's an image that gives the reader an idea of how this feature works (click the image to enable/disable hill shading):

Figure 4: Hill shading demonstration
(click image to enable/disable hill shading)Again, the free Locus Map program may not support all the features configured above. Once readers have configured the program and established whether it meets their needs, they may choose to buy the Locus Map paid version, if only to turn off the advertising. I personally think all software should be free, but it occurs to me that my views on this topic may be out of date.
For my purposes, an Android mapping/navigation program must be able to create/import/export waypoints in a convenient way. Locus Maps does this well and it's one of the reasons I chose it for this project.
Enter a Waypoint
First, let's address the task of creating a new waypoint. For this to be most convenient in the field, we'll add a custom button to the main display.
- Press the '+' button at the upper right (or long-press any existing buttons at the top right of the display, then choose "Modify panel") — this will show a panel editing dialog.
- In the panel editing dialog, choose the blue '+' at the lower right.
- Choose "Add function to panel".
- Choose "Tools" ... "Add new point".
- This will create a new button at the top right of the display that, when pressed, will add a waypoint at the current GPS position.
- Test the function — press the button, confirm that a waypoint is added to the displayed map.
Export Waypoints
To save waypoints that have been added to the map:
- Choose the Locus Map
- Choose "Points".
- This will show a list of any added waypoints, either under "Favorites" or "My Points".
- Choose the wrench at the lower right to reveal a function menu.
- Choose the Save icon (a box with a right-pointing arrow) and choose a suitable location for the exported waypoints.
- The export type will be automatically set to GPX, a widely accepted, open-source, plain-text file format that most programs accept — except Google Earth and Google Maps.
Import Waypoints
To read waypoints from an archive of waypoint files previously created by Locus Map or another mapping program:
- Choose the Locus Map
- Choose "Points".
- Press the option menu symbol
at the upper right.
- Choose "Import".
- Navigate to the location on the Android device of your waypoint files and choose a file.
- If the selected file contains valid GPX syntax, the imported waypoints will appear on the map.
I recommend that users test their ability to enter waypoints easily before embarking on a field trip — walk around and try entering waypoints in advance of actually needing to do so in the field. In connection with this activity, I recommend that users try speaking waypoint labels instead of typing them in. Most modern Android devices allow speech-to-text entry instead of typing, and field recording of waypoints seems an ideal application for this feature.
Locus Maps is a very complex but well-written program, with many more features than we've covered here. In particular I draw the reader's attention to a menu of map display options:
- Choose the Locus Map
- Choose "Settings".
- Choose "Maps".
- Choose "Map Objects".
One feature on this list that I find useful is "Dynamic Elevation," which automatically provides the elevation of the center of the map (shown in Figure 3 and below). But there are many more such features in this program, worth exploring.
In conclusion, once I completed this project, I realized I can and should retire my lame handheld GPS receiver with its tiny uninformative display (Figures 1 above and 5 below), and carry an Android device into the field — something I had been doing anyway, for other reasons.
Here's a somewhat silly before/after image comparison. The left image is of the Garmin Oregon 450 GPS receiver I've been carrying around for about seven years. The right image is a Samsung Galaxy S2 8.0, running Locus Map, displaying the same waypoint set:
Figure 5: Garmin Oregon 450 display
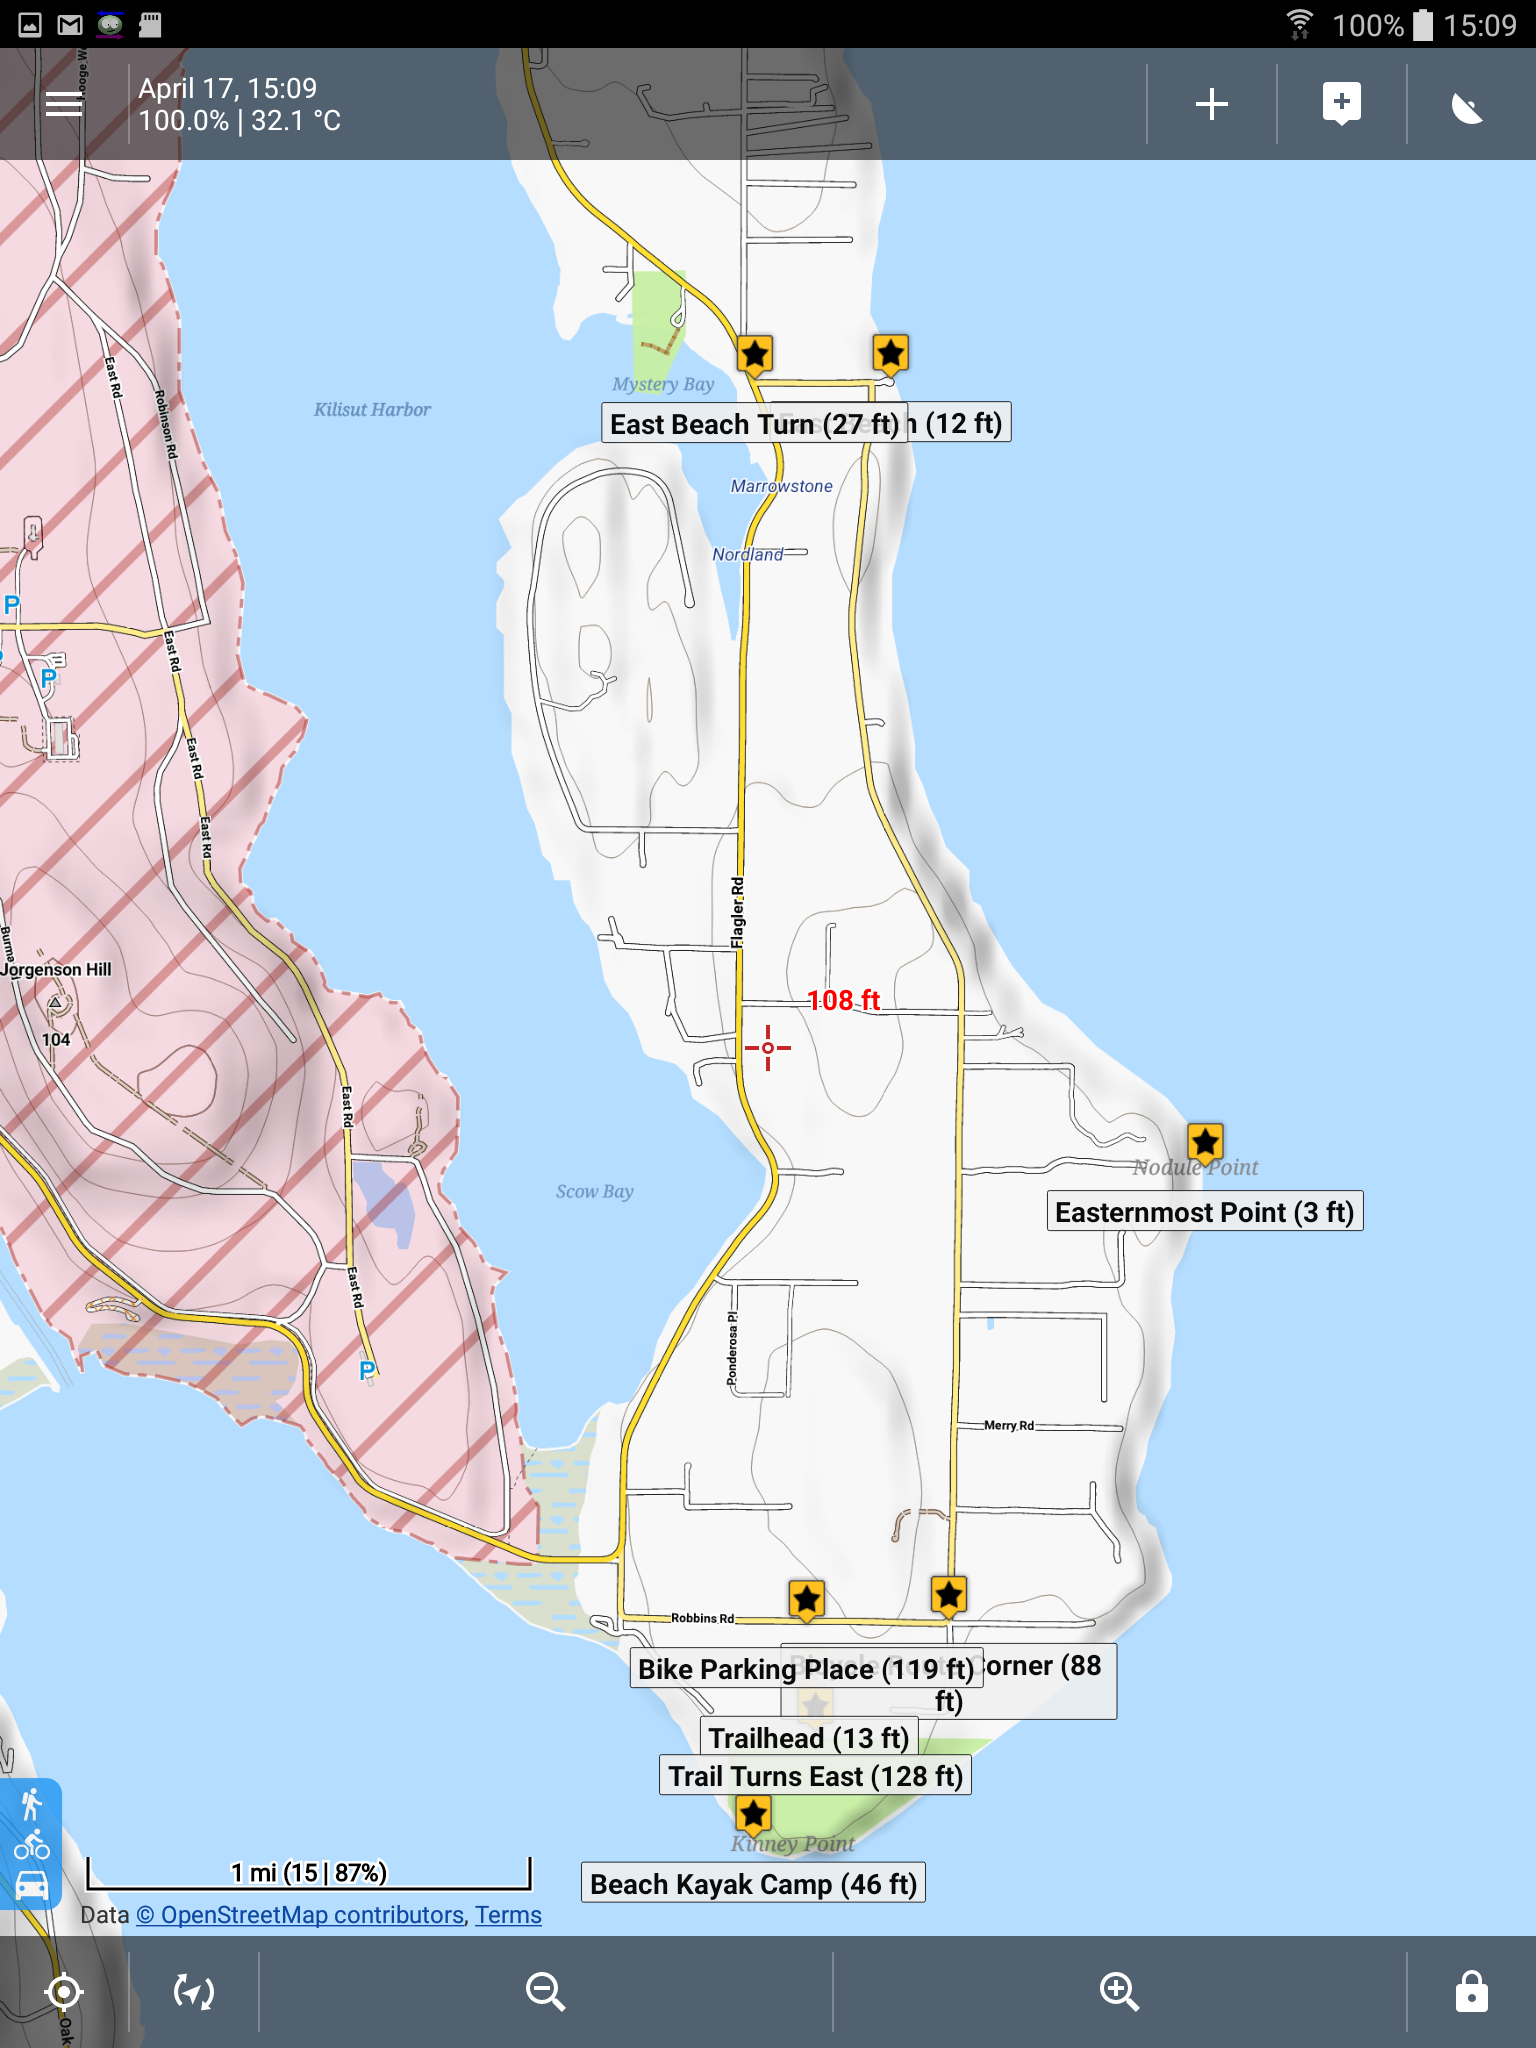
Figure 6: Samsung Galaxy S2 8.0 display
In fairness to Garmin, my Garmin handheld GPS receiver is more water-resistant and tolerates more physical abuse than an Android device could, and its LCD display can be read in full sunlight, not true for the Android device.
I hope this project turns out as well for you as it has for me, and thanks for reading.
| Home | | Android | | | | Share This Page |