Share This Page
| Home | | Linux | | | | Share This Page |
Modern methods to copy, archive and communicate
— P. Lutus — Message Page —
Copyright © 2018, P. Lutus
Most recent update:
(double-click any word to see its definition)
This introductory article explains how to use Secure Shell in a clear and goal-directed way. Most of this article's examples are for Linux, but with small changes they work the same in Windows.
The name "Secure Shell" refers to a certain protocol, and to some extent a collection of computer utilities, that make computer network operations simple, reliable and secure:
- Simple because the methods used are intuitive and easy to understand.
- Reliable because the network traffic is handled by carefully engineered programs that share a common protocol and come from the same source.
- Secure because all network traffic is encrypted using advanced cryptographic methods.
Backup/Archive Files and Directories
Here's a brief Secure Shell example (more fully explained below) — let's say you want to make a full backup archive of a directory tree consisting of thousands of subdirectories and files to a backup storage device located on a local or remote network. With Secure Shell you would enter this into a shell session:
user@server:~$ rsync -av /source-path/ user@remote-server:/dest-path/(The password entry requirement can be eliminated using a method explained below.)
user@remote-server's password:The above command creates an exact copy of the source directory tree at the destination. In subsequent invocations of the same command, rsync only copies files that have changed, which makes this a very efficient backup/archiving method.
Many more powerful Secure Shell features are described below.
Secure Shell is so efficient and reliable that it has become the preferred method for handling many network activities, and because of its advantages, it's now the recommended replacement for telnet, ftp and other methods that are less efficient and/or secure.
Intrigued? Let's move on to setting up Secure Shell.
Linux:
This setup procedure assumes you're running Ubuntu Linux, or one of the Ubuntu offshoots (Lubuntu, Kubuntu, etc.) or another Debian-derived distribution.
In this step we install OpenSSH (a set of open-source SSH utilities) and Avahi (an implementation of the Zeroconf automatic network configuration scheme). Open a shell session and enter this:
user@local-system:~$ sudo apt install openssh-server openssh-client avahi-utils
[sudo] password for user:In modern Linux distributions, this install action may only be precautionary, because the packages may be installed by default.
Now let's generate a user encryption key:
user@local-system:~$ ssh-keygen -N ''(Note: the command-line argument -N '' is a zero-length string, not a space enclosed by asterisks.)The system will normally respond like this:
user@local-system:~$ ssh-keygen -N ''Press Enter to accept the default location and continue. But the system may respond with this:
Generating public/private rsa key pair.
Enter file in which to save the key (/home/user/.ssh/id_rsa):user@local-system:~$ ssh-keygen -N ''
Generating public/private rsa key pair.
Enter file in which to save the key (/home/user/.ssh/id_rsa):
/home/user/.ssh/id_rsa already exists.
Overwrite (y/n)?In this case, without a special reason and to keep from overwriting an existing key, reply with 'n'. For reasons given below, it's not a good idea to create new public/private key pairs where such keys already exist.
Zeroconf on Linux
The above-described installation uses the Avahi package to implement Zeroconf (meaning zero configuration), a nice local name resolution protocol. This protocol allows you to find your local-network machines by name. To test the feature, enter this in a shell session:
user@local-system:~$ ping local-machine-name.localReplace "local-machine-name" with the hostname of a local network machine. If this command produces a valid outcome, then Zeroconf is working and no further action is required. If the above command doesn't work, do this:
user@local-system:~$ sudo systemctl enable avahi-daemon
user@local-system:~$ sudo systemctl start avahi-daemonIf these commands don't succeed, try reinstalling the 'avahi-utils' package described earlier.
This completes the Linux Secure Shell and Zeroconf installation. Some tweaks and configuration options will be described later.
Windows:
Even though Microsoft doesn't own Secure Shell and tends to resist allowing non-Microsoft properties in Windows, recent public pressure has resulted in the reluctant and partial acceptance of the open-source GPL-licensed OpenSSH program suite into Windows.
Here's how to install/enable OpenSSH in Windows 10:
- Navigate to Settings ... Update & Security ... "for developers"... enable Developer Mode.
- Use the Start menu search box to search for "manage optional features".
- Select the "Manage Optional Features" search result.
- Select "Add a Feature."
- Select the two features "OpenSSH Server" and "OpenSSH Client" if they appear in the list.
- Once the features have been installed, restart Windows.
The above is the official install method described online, but in late Fall 2018 only the OpenSSH client is available, the server feature still isn't in the list of available features. There's a much more complicated and less newbie-friendly way to install and enable the server, with instructions available online, but because of its complexity I won't be covering it here.
To test the OpenSSH client, open a command prompt (or PowerShell) and enter this:
C:\Users\user> ssh
usage: ssh [-46AaCfGgKkMNnqsTtVvXxYy] [-b bind_address] [-c cipher_spec]
[-D [bind_address:]port] [-E log_file] [-e escape_char]
[-F configfile] [-I pkcs11] [-i identity_file]
[-J [user@]host[:port]] [-L address] [-l login_name] [-m mac_spec]
[-O ctl_cmd] [-o option] [-p port] [-Q query_option] [-R address]
[-S ctl_path] [-W host:port] [-w local_tun[:remote_tun]]
[user@]hostname [command]
C:\Users\user> |This help list shows that the OpenSSH client installation was successful.
If the above isn't the outcome, if instead you see:
C:\Users\user> ssh
'ssh' is not recognized as an internal or external command,
operable program or batch file.
C:\Users\user> |Then something went wrong with the OpenSSH client installation. In a case like this, the Windows user has a number of options:
- Repeat the above instructions, remembering to reboot after the installation.
- Install WSL and install OpenSSH in that environment (simpler overall but this environment has no access to the Windows environment).
- Abandon Windows and Install Linux, where everything is much easier, as well as being free.
I think the reader may be able to guess which option I recommend most often.
Zeroconf on Windows
In the above-described Linux installation, a package named "avahi-utils" installs a package named Avahi, which implements a protocol called Zeroconf (meaning zero configuration). This allows local machine names to be resolved with almost no effort. There is a similar package for Windows but, because it makes Windows better and easier to use, Microsoft will never support or include it — it must be installed in an unofficial way:
- Download and install Bonjour Print Services for Windows.
- While installing, be sure to disable all the pre-enabled manufacturer-provided options meant to invade your privacy.
- Test the install in a command prompt this way:
C:\Users\user> ping hostname.local- Use a known host name from your local network.
This completes the Windows OpenSSH and Zeroconf setup.
Passwordless logins
Setting up passwordless logins has two parts, depending on the goal. One may want to avoid having to type in a password for convenience on a local network, but for Secure Shell connections across the Internet, disabling password logins entirely is desirable.
First, for a local network, to eliminate the requirement for password entries, do this from a client machine:
user@local-system:~$ ssh-copy-id user@remote-server
user@remote-server's password:Enter the user password — it will be the last time you need to enter it. This action creates a trust relationship between the client and server machines, and a password is no longer required.
Internet Security Precautions
The above action frees the user from the inconvenience of password entry. But for Secure Shell connections across the Internet (where the server allows Internet connections), it's a good idea to take another step and disallow password logins entirely, otherwise hackers will try to guess your password perpetually.
This security setup has two parts — the password-entry elimination shown above, then editing the Secure Shell server configuration to disallow password logins:
- On Linux, edit the file /etc/ssh/sshd_config:
user@local-system:~$ sudo nano /etc/ssh/sshd_config- Add, uncomment and/or edit these lines:
ChallengeResponseAuthentication no PasswordAuthentication no UsePAM no- Save the edited file.
- Restart the Secure Shell server (this example is for Debian-derived distributions):
user@local-system:~$ sudo systemctl restart sshdMake these changes before exposing your Secure Shell server to the Internet. And be sure to test their effect before opening the Secure Shell port to the wider world.
Once you've made the above security-related changes, there's no need to use a special "secret" port for Secure Shell, as is often suggested in online guides. Since the normal Secure Shell port (22) will no longer respond to login requests, it doesn't matter what value it has and it might as well be the default.
Having completed the above steps, the Secure Shell server can be safely exposed to the Internet through your system's router. Configuring a router to allow a local service to be exposed to the Internet is (a) beyond the scope of this article and (b) well-covered on the Internet.
Archive/Backup with rsync
This activity was briefly shown in the introduction above — here are additional details.
Data backup is an essential procedure for anything more than a few minutes of computer work. The ideal backup method would create an identical copy of the user's data files on a backup device, either local or remote.
Local backup
For a local full data backup between source and destination directories/devices (this specific example doesn't use Secure Shell):user@server:~$ rsync -av /source-path/ /dest-path/If this is the first invocation of "rsync", the task will require the same amount of time as an ordinary file copy command. So where's the advantage?
- On subsequent invocations rsync only copies files that have changed since the prior backup, so this is a very efficient archive updating method.
- When a network location is specified, the transactions are encrypted, which means this backup operation can be carried out across the Internet, to any computer in the world, with very good security.
Network backup
This variation copies to a network destination — either local or on the Internet. Be sure to disallow password logons (configuration shown above) before using an Internet destination for your backups.
user@server:~$ rsync -av /source-path/ user@remote-server:/dest-path/Backup with Full Synchronization
The above rsync examples copy changed files to the destination, so the destination archive contains all new files, plus old files that may not be present on the source any more. To create an exact copy of the source archive on the destination, add the command-line argument "--delete":
user@server:~$ rsync -av --delete /source-path/ user@remote-server:/dest-path/The "--delete" argument deletes any files from the destination that are not on the source, so the two archives are identical (this is called "synchronization"). Be careful when using this option — if the wrong directories are chosen, all files from the destination may be deleted.
Backup/Transfer/Shell Sessions with Android Devices
I wrote an Android application that allows rsync to archive/copy data from a desktop/laptop machine to the Android filesystem, as well as allow shell sessions and other activities. It's called SSHelper — it's free, open-source, no ads, no "get pro" nonsense. Most of the features in this section work with Android by way of SSHelper and other similar applications.
Remote Shell Session
You can log into a networked computer for an encrypted shell session:
user@local-system:~$ ssh user@remote-server(The password entry requirement can be eliminated using the "passwordless logins" method shown above.)
user@remote-server's password:
user@remote-server:~$Now you're logged onto the remote system and have the same abilities you would have if logged on locally.
Launch Remote GUI Application
You can even launch a remote desktop GUI application, with the application's display visible locally:
user@local-system:~$ ssh -X user@remote-server firefox
user@remote-server's password:At this point, assuming the local and remote systems share the same basic architecture, the remote Firefox invocation's graphical display will appear in the local system's desktop environment.
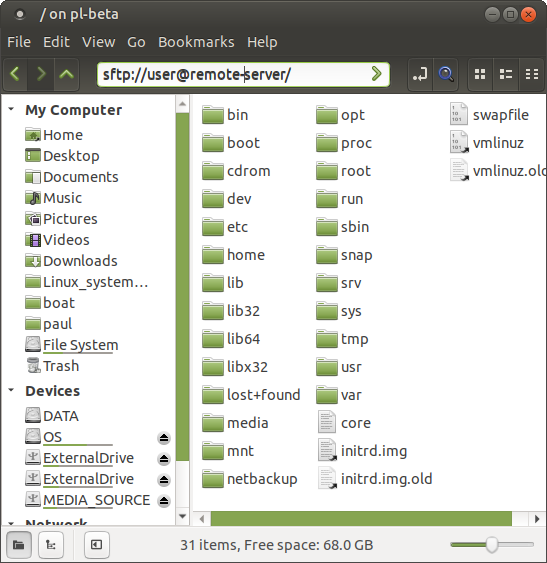
Graphical File Transfers using Drag & Drop
For this Linux example, open two graphical file browsers — one will list a network system's files and directories, the other will list local ones. The only difference between them is that the network browser has an entry like this in its address bar:
sftp://user@remote-server/remote-path/Now you can drag and drop files and directories between the browsers. If configured as above, the network browser can be set up to display the contents of any networked system in the world:
Network file browser:
Local file browser:
Mount a Remote Filesystem
There's a Secure Shell accessory that allows a local mount of a remote filesystem. It's most easily used with a server for which you have passwordless access, but this is not required. Here's a simple setup procedure:
- If necessary, install the Secure Shell filesystem utility "sshfs":
user@local-system:~$ sudo apt install sshfs
[sudo] password for user:- If needed, create a mount directory (this directory can have any name or location, but it must be empty):
user@local-system:~$ mkdir mymount
- Mount the remote filesystem to your local mount directory:
user@local-system:~$ sshfs user@server:/path-to-directory/ mymountNow the local directory "mymount" is linked across the network to the remote directory at "user@server:/path-to-directory/". You can read, write and perform any other actions you want, just as though the directory is a local one.
- When you're done with the remote directory, disconnect it:
user@local-system:~$ fusermount -u mymount
— or —
user@local-system:~$ sudo umount mymount
[sudo] password for user:- If you want access to a directory on an Internet-based system, for maximum security be sure to use the passwordless logon procedure described earlier.
System Rescue
It's a very good idea to activate and enable a Secure Shell server on every system, for a reason that may not occur to you until something bad happens. The reason is that one may use a Secure Shell session to rescue a system that won't boot properly or that has a malfunctioning display.
It's often the case that a system that has no display, or whose input methods (keyboard, mouse) aren't working, or that won't show a desktop environment, can still be accessed from the local network by way of Secure Shell. Just move to another system on the same network and log in there:user@local-system:~$ ssh user@failed-system
user@failed-system's password:Now you can examine error logs and perform other repair actions.
Most Secure Shell servers won't allow a root login (for good reason), so to acquire root authority on a failed system, first log on as a normal user, then either use 'sudo' for single commands or acquire a root shell with 'sudo su'.
Dealing with Errors
There are some errors unique to Secure Shell that, once understood, are easily dealt with. Here's a classic error display that is sometimes seen in sufficiently complex Secure Shell setups:
user@local-system:~$ ssh user@remote-server
@@@@@@@@@@@@@@@@@@@@@@@@@@@@@@@@@@@@@@@@@@@@@@@@@@@@@@@@@@@
@ WARNING: REMOTE HOST IDENTIFICATION HAS CHANGED! @
@@@@@@@@@@@@@@@@@@@@@@@@@@@@@@@@@@@@@@@@@@@@@@@@@@@@@@@@@@@
IT IS POSSIBLE THAT SOMEONE IS DOING SOMETHING NASTY!
Someone could be eavesdropping on you right now (man-in-the-middle attack)!
It is also possible that a host key has just been changed.
The fingerprint for the ECDSA key sent by the remote host is
SHA256:f2ca1bb6c7e907d06dafe4687e579fce76b37.
Please contact your system administrator.
Add correct host key in /home/username/.ssh/known_hosts to get rid of this message.
Offending ECDSA key in /home/username/.ssh/known_hosts:25
remove with:
ssh-keygen -f "/home/username/.ssh/known_hosts" -R "remote-server"
ECDSA host key for pl-delta has changed and you have requested strict checking.
Host key verification failed.This error message alerts the user to the fact that the public key transmitted from the server to the client has changed since the last login, which could have security implications. The details:
- As part of the login transaction between server and client, the server transmits its public key to the client as part of the data encryption process (among other things this prevents transmitting passwords in plain-text form).
- As a preliminary step, the client checks the server's public key against a record it keeps of prior logins in a file located at /home/username/.ssh/known_hosts.
- If a public key for the server is present in the known_hosts file (acquired during an earlier login), the client checks for a match with the new public key.
- If the new and old public keys do not match, this may mean that an impostor — a hacker — has intervened in the communication pathway between server and client (this is called a "man-in-the-middle" or MITM attack), so the client alerts the user to this possibility as shown above.
In most cases, this error results from an innocent but ill-advised change in the server's public/private key pair after the initial installation. The normal remedy is to remove the server's old public key from the client's /home/username/.ssh/known_hosts file, which the above error message suggests:
user@local-system:~$ ssh-keygen -f "/home/username/.ssh/known_hosts" -R "remote-server"A better overall strategy is not to recreate public/private key pairs unless absolutely necessary.
Dual-boot Problem
In a local network with one or more dual-boot systems, a special version of the above wrong-public-key error takes place. If a client computer logs onto a dual-boot machine that's running linux, and later logs in when that machine is running Windows with OpenSSH installed, in one of these cases the wrong public key will be provided by the server and the above error message will appear.The simplest remedy in this case is to copy the server public-private key pair from one of the two operating systems to the other, thus making the two appear to be the same server.
Esoterica
In an earlier article I described some more exotic and less-often-used Secure Shell features — features not suitable for this introductory article. Follow this link to read the earlier article.
This section deals with the theory behind Secure Shell, configuration issues and some common problems.
A typical Secure Shell installation can act as a server (or host) (i.e. provide Secure Shell services to clients that log on) or as a client (i.e. log into Secure Shell servers).
Configuration files
File(s) Location Created/Written by Purpose Comments id_rsa
id_rsa.pub/home/user/.ssh Client Public/private encryption keys1 Generated by client in user context by:
$ ssh-keygen -N ''authorized_keys /home/user/.ssh Server (user context) Allows passwordless logins2 Populated by server (user context) in response to client action:
$ ssh-copy-id user@serverknown_hosts /home/user/.ssh Client Keeps a record of known successful logins Populated by client, creates error if subsequent server login keys don't match3 config /home/user/.ssh Client Client configuration data (see ssh_config) Client reads this configuration first ssh_config /etc/ssh Server Client configuration data (see ssh_config) Client reads this configuration after .ssh/config sshd_config /etc/ssh Server Server configuration data (see sshd_config) Server reads this configuration on instantiation ssh_host_rsa_key
ssh_host_rsa_key.pub/etc/ssh Server Public/private encryption keys Generated by server during installation
- There are a number of available encryption protocols, including dsa (now deprecated), ecdsa, ed25519 and rsa.
- If a client creates an entry with the "ssh-copy-id" command, the server (user context) "authorized_keys" file allows passwordless logins. This is merely convenient on a local network, but is an essential part of disallowing password-based logins for secure Internet exposure.
- When a Secure Shell client logs onto a server, the server provides its public key. This key is compared to keys in the client "known_hosts" file recorded during prior logins, and if the keys aren't the same a rather scary error message is printed (example above), because this is indicative of a man-in-the-middle (MITM) attack. But the most common reason is that the server's encryption key has changed (which is why changing keys is a bad idea).
File Permissions
A change in user context file permissions is a common reason for errors and failure of Secure Shell transactions. This is particularly important at the user-level ".ssh" directory and files, which must have particular permissions to allow Secure Shell to function.
According to the OpenSSH documentation on this topic, the user-level ".ssh" directory should have read/write/execute permissions for its owner, and be inaccessible by others. The private key(s) within this directory must be inaccessible by users other than its owner — if this condition is not met, that key file will be ignored by the Secure Shell client program.
Secure Shell Technical Description
People have invented many encryption methods over the centuries. Most of them suffered from one vulnerability or another. For example a cryptographic system might require delivery of a decryption key to all recipients of secure communications, and if that secret key were intercepted, the system would be compromised.
Modern secure communication relies on a system called "public-key cryptography", which remarkably does not require secure transmission of a decryption key. In fact, the system works even though the sender and recipient never meet — this eliminates a classic vulnerability of older methods caused by the need to securely transmit a decryption key.
Briefly, public-key cryptography relies on the difficulty of computing the prime factors of large composite numbers:
- Integers can be separated into two groups — prime and composite.
- A prime number is a number only divisible by itself and 1.
- A composite number is one composed of primes, example 15,553 = 103 x 151. The numbers 103 and 151 are prime, the number 15,553 is composite.
- The security of public-key cryptography relies on the difficulty of factoring large composites:
- Locating two large prime numbers is easy.
- Creating a composite number by multiplying primes together is also easy.
- But factoring the composite number — mathematically finding that number's prime factors — is very difficult.
- This asymmetry between creating (easy) and factoring (hard) composite numbers is the basis for public-key cryptography.
- In public-key cryptography, two encryption keys are generated by each participant — a public key that can be safely distributed publicly, and a private key held in secret by the key pair's originator.
- In a typical transaction, the sender of a message uses the recipient's public key to encrypt the message and transmits it to the recipient in publicly accessible communication channels.
- An intruder without access to the secret private key would have to (in a manner of speaking) mathematically factor the public message to find the private key, but as explained above this is not practical for a sufficiently large key size.
- Only the intended recipient possesses the private key, which is used to factor (decode) the encrypted message into its plain-text form.
- This is a greatly simplified description — read this reference for more detail.
In this remarkable system the computer algorithms used to encode and decode messages can be made public, the technical details can also be made public, and the public key of a public/private key pair can be made public, without compromising the security of communications. Only the private key needs to be protected.
| Home | | Linux | | | | Share This Page |